AzureDev Project Documentation
by Rob Das
DTEK Consulting Services Ltd.,
Alberta, Canada
January 2022 — May 2023
The AzureDev web application can be found here: https://rob-das-win.azurewebsites.net/
Introduction
AzureDev — A Cloud Development Project
AzureDev is a research and development project to explore the Azure cloud hosting platform. It uses C# .NET to build a secured, MVC core web application that is hosted in the cloud. AzureDev has many of the features that you would expect to find in any data-driven application.
AzureDev is also a pilot project to demonstrate the feasability of migrating dotnet web based applications currently hosted on premises with IIS in Windows Server, and reprogramming them to run serverless in the cloud. By keeping the component applications as simple as possible and focusing on how they connect and work with each other, the AzureDev project has produced templates, which can be used to move other dotnet web based applications to the Azure cloud.
AzureDev is a reference application for Azure development using C#.NET.
About the Author
The AzureDev project and associated documentation, including this readme file, were written, developed and produced by Robi Indra Das, Microsoft Certified Azure Developer, owner, manager, and senior development consultant for DTEK Consulting Services Ltd.
Executive Summary
September 21, 2022. The source code repository on GitHub for project AzureDev contains a Visual Studio solution consisting of an MVC web app, a web API back end, which in turn makes calls to a set of microservices (Azure functions) to access a Cosmos DB database.
Conceived in 2021 as a .NET Core version 5 application, AzureDev is evolving with .NET as it changes. It’s purpose is to serve as a framework for trying out programming techniques and exploring technology. AzureDev is intended to be a successor to the Technology Exploration Website version 3 (TEW3), which at least for the time being, is still hosted on-premises by DTEK Consulting Services Ltd. The initial release of AzureDev, completed on March 31st, 2022, was tagged as version 4.0.0.0 as it was a complete re-write and shares no code with TEW3.
The requirements for the initial release of AzureDev were driven by the need to provide secured access to the website and its data using the Azure Active Directory, single tenant model. Authentication and authorization was accomplished using ID tokens, access tokens, and RBAC app roles to provide:
- limited access to everyone, authenticated or not
- greater access to users authenticated with a low-security role
- unlimited access to users authenticated with a high-security role
Additional requirements for the initial release (4.0.0.0) were to build the API by following the restful API design pattern; and to manage the source code in a private Github repository.
AzureDev 4.0.0.0 was released on April 1st, 2022.
In April of 2022, utilizing .NET core version 6, work began on AzureDev’s data-access layer by adding a console application, named CosmosDbConApp, to facilitate testing and development of a Cosmos DB database, with the intention of placing the data-access layer behind the API back end. This was followed in May of 2022 by creating a free tier Azure Cosmos DB account in Azure to serve as the online database for AzureDev, and by building an on-premises Windows server to host an instance of the Cosmos DB emulator, which serves as a local test and development database server. CosmosDbConApp was written to to easily switch between databases by specifying only the database connection string as an application setting.
In June, coding was put on hold in order to build maintainable, in-depth documentation in the form of a readme file (this file). A markdown version, README.md, was created in the Github repository, as per the standard; and a second README.html file was generated from README.md by utilizing a freely available online markdown editor, Stackedit.IO. A procedure was devised to keep the readme files synchronized – details can be found below in the section called Admin Procedures/Updating the Documentation.
The next phase of the project explored ways to create microservices using Azure Functions and thereby further abstracting and encapsulating the access to the database. The FunctionApp module was created in Visual Studio using the Azure Function project template. A number of functions were created as microservices, with each function implementing a restful API operation (post, get/get all, put, and delete). A Cosmos DB database, named azuredev, containing a collection, named simpledata, was created. The simpledata collection was based on the SimpleDataModel C# class, which was created earlier for the initial release. Each function was made as simple as possible by utilizing Azure Function parameter binding to do the heavy lifting.
AzureDev 4.1.0.0 was released on September 16, 2022.
This release builds upon the previously released web front-end MvcApp, and the API web service WebApi. This release adds the Cosmos DB database, the Azure Function microservices that provide access to the Cosmos DB database FunctionApp, and the Cosmos DB testing console app CosmosDbConApp. All Azure hosted modules are now secured using OAuth 2.0, Open ID Connect, Microsoft Identity, as well as various other keys, tokens and certificates. The README documentation files are now up-to-date, documenting the entire AzureDev project as far as release 4.1.0.0
The project has an unlimited timeline so as not to stifle the creativity of the developers. The project also has a ZERO DOLLAR budget, forcing the developers to think creatively, explore free tier hosting options in Azure, explore the use of emulators, and make full use of existing company owned, on-premises computing resources — improvise, adapt, and overcome! For example, the Cosmos DB Emulator is now being hosted on a repurposed, dedicated on-prem Windows Server with access from all developer computers on the internal network.
Update 2022-Nov-07
AzureDev has been refactored to store secrets in a key vault AzureDevKV. The secrets in the key vault are now referenced from app settings, instead of storing the secrets directly in the app settings. AzureDev has also been refactored so that all references to FunctionApp from MvcApp have been removed thereby making WebApi the only place that accesses the function app. Other minor refactoring has been done to improve the long term maintainability of the AzureDev code base.
AzureDev 4.1.1.0 was released on November 7, 2022.
Update 2022-Dec-12
AzureDev has been refactored to use an API in the newly created APIM azuredevapim to access simple data items in the database. The API is codeless because it was created by importing FunctionApp into APIM. The Web API app is no longer needed to call the FunctionApp.
AzureDev 4.1.1.4 was released on December 12, 2022.
Update 2023-Jan-22
The AzureDev web api has been refactored by introducing the repository pattern and the entity framework core 6 cosmos db provider, to implement the compound data object (product/category). This release also includes the SeedDatabase console application to reinitialize the data in the cosmos db database, which also uses entity framework.
AzureDev 4.1.2.0 was released on January 22, 2023.
Update 2023-Apr-29
Although the 4.1.2.0 release in 2023-Jan-22 met all the original requirements, it was clear that there was going to be an ongoing need to make updates for new features. To keep track of new features to be added, a section was added to the project documentation to help plan future releases (see AzureDev Next Release). Future changes were tracked in a table called Backlog. This approach was found to be inadequate, and the decision was made to make use of an issue tracking system. Azure DevOps was chosen and the backlog of tasks was put into the Azure DevOps Boards. While researching Azure DevOps, it was found that an Azure DevOps CI/CD pipeline would be a much better way of publishing new releases, instead of continuing to use the publishing wizard from Visual Studio 2022. It was also decided to move the entire AzureDev codebase from GitHub to Azure DevOps Repos. Making use of Azure DevOps Boards, Repos, and Pipelines made it possible to keep everything together in a single toolset.
AzureDev 4.2.0.0 was released on April 29, 2023.
1. Design Overview
1.1 High Level Design

The data access layer is contained within a restful API WebApi. The application is built as a single tenant AAD (Azure Active Directory) application - all security is managed under the AAD tenant named DTEK. While the application objects themselves are being hosted on a separate AAD tenant named Default Directory.
2. AzureDev Components
2.1 How AAD Tenants Are Used to Manage Components

In order to enable secure access to the applications as a whole, the boundary between AAD tenants provides an explicit separation of responsibilities.
Note: this diagram was created for the initial release which had only two modules: MvcApp and WebApi. Since then, other modules have been added, including FunctionApp.
2.2 AAD Tenants
Tenant is another word for AAD directory. A tenant is also associated with a domain, which can be found in the Portal on the tenant’s Active Directory, Overview page.
| Tenant Name | Purpose |
|---|---|
| Default Directory | hosting of application objects and associated resources |
| DTEK | managing security, authentication, users, apps (via service principals) |
2.3 AzureDev Application Objects
The application objects for the web app, the API app, and the function app are hosted using PaaS (platform as a service). This is accomplished using the PaaS feature known as App Services. The associated app service plan is contained in the AAD tenant named Default Directory.
2.4 AzureDev Service Principals or App Registrations
The app registration, also know as service principal, is the local instance of the app in a specific AAD tenant. The web app, registered as MvcApp in the DTEK AAD tenant, is the local instance of the rob-das-win application object. Similarly, the API app, registered as WebApi, is the local instance of the rob-das-api application object.
2.5 Noteworthy Users
The users of the application, referenced in the test plan section of this document, are managed in the DTEK AAD tenant.
| User | Identity | AAD Tenant |
|---|---|---|
| Admin | admin@dtekorg.onmicrosoft.com | DTEK |
| Tester | tester@dtekorg.onmicrosoft.com | DTEK |
| Newguy | newguy@dtekorg.onmicrosoft.com | DTEK |
Each AAD tenant has a global administrator. And one additional test user is in the Default Directory AAD tenant to facilitate testing the capabilities of external users who do not belong to the DTEK AAD tenant.
3. AzureDev Applications
| display name | appid | tenant id | client credentials | redirect URI | Application ID URIs |
|---|---|---|---|---|---|
| MvcApp | a6dc5518-… | ed4343db-… | 1 secret | 2 web | none |
| WebApi | b554845f-… | ed4343db-… | none | none | api://b554845f-… |
| FunctionApp | none | none | function keys | none | none |
MvcApp is an MVC Core web application that is secured by OAuth 2.0 and OIDC. It provides the front-end user interface that is able to securely interact with the web API back-end.
WebApi is a service application that is called by client applications, returning information as JSON. To meet this need, WebApi was built as an MVC Core restful API. The API contains three example resources to represent simple and compound data. The API resources are named SimpleData, Category, and Product. Simple data is defined by a single class containing key/value pairs and declared in the SharedModels.SimpleDataModel C# class. Compound data is declared in the SharedModels.CompoundDataModel C# class, which contains a pair of related classes called Category and Product that have a one-to-many relationship.
FunctionApp is an Azure function app hosting multiple functions that implement microservices. These microservices implement CRUD operations against the Cosmos DB database.
3.1 Application Configuration Settings For MvcApp
This section describes the application configuration settings for MvcApp.
MvcApp appsettings.json
{
  "AzureAd": {
    "Instance": "https://login.microsoftonline.com/",
    "Domain": "XXXXXXX",
    "ClientId": "XXXXXXXX-XXXX-XXXX-XXXX-XXXXXXXXXXXX",
    "TenantId": "XXXXXXXX-XXXX-XXXX-XXXX-XXXXXXXXXXXX",
    "CallbackPath": "/signin-oidc"
  },

  "ApiAuthentication": {
    "Instance": "https://login.microsoftonline.com/",
    "ClientId": "XXXXXXXX-XXXX-XXXX-XXXX-XXXXXXXXXXXX",
    "TenantId": "XXXXXXXX-XXXX-XXXX-XXXX-XXXXXXXXXXXX",
    "ClientSecret": "XXXXXXXXXXXXXXXXXXXXXXXXXXXXXXXXXXXXX",
    "BaseAddress": "https://localhost:44301",
    "Scope": "api://api://xxxxxxxx-xxxx-xxxx-xxxx-xxxxxxxxxxxx/.default"
  },

  "Logging": {
    "LogLevel": {
      "Default": "Information",
      "Microsoft": "Warning",
      "Microsoft.Hosting.Lifetime": "Information"
    }
  },
  "AllowedHosts": "*"
}
“AzureAd” Section
“AzureAd” is the config section used for user login authentication with Microsoft Identity Platform. It is referenced in Startup.cs.
The whole section is passed as a parameter to AddMicrosoftIdentityWebApp().
This section contains the following properties.
- “Instance” is set to “https://login.microsoftonline.com/”
- “Domain” set to the domain of the DTEK Tenant/Directory
- “ClientId” this is the Application (client) ID of the MVC application that was registered with the Tenant/Directory - found on the application registration Overview page
- “TenantId” this is the Directory (tenant) ID of the DTEK Tenant/Directory - found on the Tenant Overview page
- “CallbackPath” is set to “/signin-oidc”
“ApiAuthentication” Section
This is the config section used for API authentication parameters. These parameters are used by the MVC controllers that make restful calls to the API.
The MVC application is acting as a daemon app and uses this section to identify itself to Microsoft Identity Platform.
These authentication parameters are wrapped in an ApiConfig model class and passed into the HttpAccess helper methods that perform the restful API calls.
These helper methods use the authentication parameters to firstly obtain access tokens and attach those access tokens to HttpClient authorization request headers.
And secondly to make the actual call with the HttpClient to the restful API.
This section contains the following properties:
- “Instance” is set to “https://login.microsoftonline.com/”
- “ClientId” this is the Application (client) ID of the MVC application that was registered with the Tenant/Directory - found on the application registration Overview page
- “TenantId” this is the Directory (tenant) ID of the DTEK Tenant/Directory - found on the Tenant Overview page
- “ClientSecret” this is the client secret created for the MVC application that was registered with the Tenant/Directory,
- “BaseAddress”: this is the base address of the API app - this changes depending on whether the API being called is running on the localhost or in Azure
- “Scope”: uses the naming convention api://{clientId of the API}/.default. Scopes restrict access to data and functionality protected by the API. An application that requires access to parts of this API can request that a user or admin consent to one or more of these. Apps using the client credentials flow must use a static scope definition that has been configured in the portal. The .default suffix indicates that the pre-configured scopes/roles are used.
Note: ClientId is the same in both of these sections - it refers to the MVC app, not the API app.
The client id of the API app is only used in the Scope property.
3.2 Application Configuration Settings For WebApi
This section describes the application configuration settings for WebApi.
WebApi appsettings.json
{
  "AzureAd": {
    "Instance": "https://login.microsoftonline.com/",
    "Domain": "XXXXXXX",
    "TenantId": "XXXXXXXX-XXXX-XXXX-XXXX-XXXXXXXXXXXX",
    "ClientId": "XXXXXXXX-XXXX-XXXX-XXXX-XXXXXXXXXXXX",
  },

  "FunctionApp": {
    "BaseAddress": "http://localhost:7228",
    "RemoteBaseAddress": "https://{function-app-name}.azurewebsites.net",
    "CreateSimpleDataKey": "xxxxxxxxxxxxxxxxxxx",
    "DeleteSimpleDataKey": "xxxxxxxxxxxxxxxxxxx",
    "ReadAllSimpleDataKey": "xxxxxxxxxxxxxxxxxxx",
    "ReadSimpleDataItemKey": "xxxxxxxxxxxxxxxxxxx",
    "UpdateSimpleDataKey": "xxxxxxxxxxxxxxxxxxx",
    "Function1Key": "xxxxxxxxxxxxxxxxxxx"
  },

  "Logging": {
    "LogLevel": {
      "Default": "Information",
      "Microsoft": "Warning",
      "Microsoft.Hosting.Lifetime": "Information"
    }
  },
  "AllowedHosts": "*"
}
“AzureAd” Section
This is the config section used to secure the API when called from another application. The calling application obtains an access token
from Microsoft identity to access the web API without any user involvement.
It is referenced in Startup.cs.
The whole section is passed as a parameter to AddMicrosoftIdentityWebApi().
This section contains the following properties.
- “Instance” is set to “https://login.microsoftonline.com/”
- “Domain” set to the domain of the DTEK Tenant/Directory
- “TenantId” this is the Directory (tenant) ID of the DTEK Tenant/Directory - found on the Tenant Overview page
- “ClientId” this is the Application (client) ID of the Web API application that was registered with the Tenant/Directory - found on the application registration Overview page
“FunctionApp” Section
This section is used by the API to call the secured functions in the function app. The six keys correspond to the six functions in the function app. Each function has its own unique key. The naming convention used for the keys in these settings is the function name with a suffix of “key”. This section contains the following properties.
- “BaseAddress” This is the common base address shared by all the functions in FunctionApp. It is used to reference the Azure functions in the current hosting environment. During development, this points to the local host computer; when published to Azure, this points to the domain hosted in Azure.
- “RemoteBaseAddress” This is the common base address shared by all the functions in FunctionApp, hosted in Azure. It facilitates testing the API in development on the local host, while calling the functions remotely in Azure.
- “CreateSimpleDataKey” This is the key used to secure the function named CreateSimpleData.
- “DeleteSimpleDataKey” This is the key used to secure the function named DeleteSimpleData.
- “ReadAllSimpleDataKey” This is the key used to secure the function named ReadAllSimpleData.
- “ReadSimpleDataItemKey” This is the key used to secure the function named ReadSimpleDataItem.
- “UpdateSimpleDataKey” This is the key used to secure the function named UpdateSimpleData.
- “Function1Key” This is the key used to secure the function named Function1.
3.3 Application Configuration Settings For FunctionApp
This section describes the application configuration settings for FunctionApp.
Configuration settings for FunctionApp are managed locally in the local.settings.json file, and remotely under the function app Settings > Configuration
FunctionApp local.settings.json
{
    "IsEncrypted": false,
  "Values": {
    "AzureWebJobsStorage": "UseDevelopmentStorage=true",
    "FUNCTIONS_WORKER_RUNTIME": "dotnet",
    "CosmosDBConnection": "AccountEndpoint=https://{cosmosdb-server-hostname}:8081/;AccountKey=XXXXXXXXXX",
  }
}
- “AzureWebJobsStorage” By specifying UseDevelopmentStorage=true here, Visual Studio will used the local host computer’s storage for the function app runtime. The corresponding setting in Azure contains the Azure storage account connection settings, including the storage account name and account key, and is created by the portal when the storage account is created.
- “FUNCTIONS_WORKER_RUNTIME” This is set to dotnet
- “CosmosDBConnection” This is the connection string for the Cosmos DB database used by the functions.
3.4 Application Configuration Settings in Other Locations
Most appsettings are stored in the application’s appsettings.json. However, sensitive settings that should not be in source control are placed elsewhere and represented with fake values in the
appsettings.json file. A secrets.json file [7] is used in the code, and in Azure the Configuration section of the applications are used to store the appsettings.
NOTE: secrets.json files are backed up in S:\Code\Secrets because they are not in source control, but cannot be lost - they contain values such as client secrets, which cannot be recovered if lost. IMPORTANT: when making changes to secrets.json, don’t forget to update the backup copy!

This way, the dummy values are replaced at runtime with the corresponding value in secrets.json locally, or with the Azure Configuration settings online. Also, application settings that have
different values in production are also in the Azure Configuration settings so that they are replaced at runtime.
Update November 2022
Secret information such as client secrets, connection strings and function keys, have been moved into an Azure key vault named AzureDevKV. See the Azure Key Vault section of this document for details.
4. The Database
The Azure Cosmos DB database was chosen as the AzureDev persistence layer for the following reasons:
- Cost: Azure Cosmos DB has a free tier; there is also an emulator that can be used for development and testing
- Flexibility: all data in any Azure Cosmos DB is stored in an ARS (atom-record-sequence) format, allowing Cosmos DB to achieve multi-modal database functionality. Atoms consist of a small set of primitive types like string, bool, and number. Records are structs composed of these types. Sequences are arrays consisting of atoms, records, or sequences.
- Performance: Azure Cosmos DB is a globally distributed database service that’s designed to provide low latency, elastic scalability of throughput, well-defined semantics for data consistency, and high availability.
4.1 Online Database: Azure Cosmos DB Account
An Azure Cosmos DB account was created. In order to qualify for the free tier, throughput has been limited to 1000 RU/s, and it will be necessary to keep the total data stored to under 25 GB. Free tier limitations are first 1000 RU/s and 25 GB of storage will be free for the lifetime of the account.
The Azure Cosmos DB account URI is https://<db-account-name>.documents.azure.com:443/
where <db-account-name> is replaced by the actual Azure Cosmos DB account name.
4.2 Development Database: Azure Cosmos DB Emulator
An internal server has been designated as the development and testing database server. It has been set up with Windows Server 2016 and the Cosmos DB Emulator which has been exposed to the internal network. To interact with the database server from C# code, the development computers need a copy of the database server’s trusted root authority certificate.
In order to use the Powershell command line interface, the Powershell profile in C:\Program Files\PowerShell\7\Profile.ps1, was modified:
Write-output "executing $PSCommandPath";
$env:PSModulePath += ";$env:ProgramFiles\Azure Cosmos DB Emulator\PSModules"
Import-Module Microsoft.Azure.CosmosDB.Emulator
$env:CosmosDBEmulatorHome = "$env:ProgramFiles\Azure Cosmos DB Emulator"
write-output "`$env`:CosmosDBEmulatorHome is $env:CosmosDbEmulatorHome"
Note: “C:\Program Files\Azure Cosmos DB Emulator” has been added to $env:path so that Microsoft.Azure.Cosmos.Emulator.exe can be run from any directory. If this were not the case, then just change directory to “C:\Program Files\Azure Cosmos DB Emulator” and precede commands from that directory with dot backslash to explicitly refer to the current directory.
To host the cosmosdb emulator on the local network, the following steps were performed.
- Shutdown the emulator (Stop-CosmosDbEmulator from powershell).
- Delete the data directory, found at %LOCALAPPDATA%\CosmosDBEmulator
- Start the emulator with the following command from the Powershell command line
Microsoft.Azure.Cosmos.Emulator.exe /AllowNetworkAccess /Key=C2y6yDjf5/R+ob0N8A7Cgv30VRDJIWEHLM+4QDU5DE2nQ9nDuVTqobD4b8mGGyPMbIZnqyMsEcaGQy67XIw/Jw==
The key is the default well-known key used by the Cosmos DB emulator. Security is based on Windows network security since the server is only accessible on the internal network.
In order to access the emulator from another client computer, the certificate with the friendly name DocumentDbEmulatorCertificate that was created by the cosmosdb emulator installer, was exported from the host, and imported into the client.
To start the emulator, enter the following command from the Powershell command line
Microsoft.Azure.Cosmos.Emulator.exe /AllowNetworkAccess /Key=C2y6yDjf5/R+ob0N8A7Cgv30VRDJIWEHLM+4QDU5DE2nQ9nDuVTqobD4b8mGGyPMbIZnqyMsEcaGQy67XIw/Jw==
To stop the emulator
Microsoft.Azure.Cosmos.Emulator.exe /Shutdown
To determine whether the Cosmos DB emulator is running or stopped
Get-CosmosDbEmulatorStatus
4.3 CosmosDbConApp
A console application named CosmosDbConApp was added to AzureDev to provide testability of database CRUD operations against the Cosmos DB database. This application was added to a Testing folder to keep it separate from the rest of the AzureDev applications. The publish profile has been set up to publish to a shared network location designated T:\Temp. After publishing, run the test application by entering the command
T:\Temp\CosmosDbConApp.exe /endpoint <URI> /key <KEY>
Where <URI> is the URI of the endpoint, and <KEY> is the Cosmos DB key.
If omitted, these parameters will default to
- <URI> “https://localhost:8081”
- <KEY> “C2y6yDjf5/R+ob0N8A7Cgv30VRDJIWEHLM+4QDU5DE2nQ9nDuVTqobD4b8mGGyPMbIZnqyMsEcaGQy67XIw/Jw==”
4.4 Database Access from AzureDev Code
This section describes three ways that the AzureDev suite of applications access the Cosmos DB database: CosmosClient, Azure Functions, Entity Framework.
CosmosClient
The Microsoft.Azure.Cosmos package was installed and added to the AzureDev.CosmosDbConApp project using the NuGet package manager. CosmosDbConApp is a console app thatis used to test connectivity to a database, based on a connection string. This app was used to verify connectivity to the cloud hosted database as well as the on-prem dev/test database server that uses the Cosmos DB Emulator. It creates a C# model class called Family that is used to represent fictitious families called the Anderson family and the Wakefield family. Using the CosmosClient, a client side logical representation of the Azure Cosmos DB account, and the Family class, CosmosDbConApp performs the following operations to fully test all CRUD operations against the database:
- Create a database
- Create a container
- Add items to the container
- Query items
- Replace items
- Delete items
- Delete the database
Azure Functions
The Visual Studio Azure Function project template was used to create the AzureDev.FunctionApp project. A set of functions were added to implement microservices that implement the basic CRUD operations against a simple data model. Each function was made as simple as possible by utilizing Azure Function parameter binding to do the heavy lifting. For details, see the top level section of this document named Azure Functions.
Entity Framework
A console app named SeedDatabase was created to seed the azuredev database with an initial set of data. The app used Entity Framework EF Core 6 and is based on the excellent you tube video https://www.youtube.com/watch?v=j5ylkjbJmu4 (highly recommended). The key take-aways from this video were:
- creating a hierarchical in-memory object model, using C# classes, to represent the items in the Cosmos DB database containers
- creating the DbContext object, named AzuredevContext, connecting DbSet objects to the Cosmos DB database container objects, and mapping them to C# classes
- performing CRUD operations with the AzuredevContext object
The code developed for SeedDatabase, specifically the AzuredevContext object, was used as an example to create the Entity Framework code in the WebApi app to store the compound data object in the azuredev Cosmos DB database. The API controller classes for the compound data model, Product and Category, were mapped to the Cosmos DB containers of the same name by introducing an abstraction layer using the repository design pattern. In this way, the user interface in the front end application, MvcApp, did not have to be changed.
5. Azure Functions
Azure functions were created to serve as microservices.
5.1 The Function App
Functions now implement simple-data model based restful CRUD operations (get, post, put, delete). By using function level authorization, each individual CRUD operation now has a function key providing additional protection over-and-above the access token authentication that protects the API itself. The simple data model is defined as:
namespace SharedModels
{
    public class SimpleDataModel
    {
        public string Id { get; set; }
        public string Name { get; set; }
    }
}
The five CRUD operations on the simple data model are implemented by Azure functions:
| CRUD operation | HTTP method | Function name |
|---|---|---|
| Create | POST | CreateSimpleData |
| Read all | GET | ReadAllSimpleData |
| Read item | GET | ReadSimpleDataItem |
| Update | PUT | UpdateSimpleData |
| Delete | DELETE | DeleteSimpleData |
Note: The CRUD read operation has been split into two distinct operations: read and read all. The code for the two operations was deemed to be sufficiently different to warrent separate implementations.
By default HTTP trigger functions are addressable with a route of the form:
http://{FUNCTION_APP_NAME}.azurewebsites.net/api/{FUNCTION_NAME}
The functions are connected to data in the database using input and output bindings. Binding to a function is a way of declaratively connecting resources to functions, allowing you to avoid hardcoding the access to the resources. Database data from bindings is provided to the function as parameters.
CreateSimpleData
Create a simple data item in the database. The functions trigger parameter, req, contains a form with the data for the new item. An out parameter, document, is bound to the “azuredev” database “simpledata” collection using a connection string. The function’s only job is to copy the data fields from the form to the document parameter.
ReadAllSimpleData
Read all simple data items in the database. An in parameter, simpleData, is bound to the “azuredev” database “simpledata” collection using a connection string. The function’s only job is to serialize the data in the simpleData parameter to JSON, and pass it back as the function’s return value.
ReadSimpleDataItem
Read a specific simple data item, by id. The functions trigger parameter, req, contains the id as part of the URL route. An in parameter, simpleData, is bound to the “azuredev” database “simpledata” collection using a connection string, and is further restricted by specifying the id. The function’s only job is to pass the item back as the function’s return value.
UpdateSimpleData
Update a specific simple data item, by id. The functions trigger parameter, req, contains a form with the data for the item. The req parameter also contains the id as part of the URL route. An in parameter, inputDocument, is bound to the “azuredev” database “simpledata” collection using a connection string, and is further restricted by specifying the id. An out parameter, outputDocument, is bound to the same database item as the input item. The function’s only job is to copy the data from the form fields into the outputDocument.
DeleteSimpleData
Delete a specific simple data item, by id. The functions trigger parameter, req, contains the id as part of the URL route. An in parameter, document, is bound to the “azuredev” database “simpledata” collection using a connection string, and is further restricted by specifying the id. A second in parameter, client, is a document client that is bound to the “azuredev” database “simpledata” collection using a connection string. The client parameter operates on the collection as a whole, and is therefore not bound to a specific item. The function’s only job is to call the client’s delete document method, passing it a link to the document identified by the document in parameter.
Update 2024-Dec-03 Function App Rewrite
The function app was originally written using the in-process web worker model. This web worker model was deprecated and had to be replaced with the dotnet-isolated model. At the same time, the database access code was rewritten to use Entity Framework for CosmosDB instead of function parameter input and output binding. The function app itself was pulled out of the AzureDev application into its own separate standalone function app. For details, please see the supplimentary material at the end of this document titled “Replacing AzureDev.FunctionApp with Standalone Function App”.
6. Security
The main resource in AzureDev requiring security for its protection is the data in the Cosmos DB database. Following the practice of multilayered security, four layers of security have been created between the end user and the data in the database.

6.1 Overview of Identity Management as used in AzureDev
The notion of identity as it applies to users and applications within the AzureDev project, is handled by the Microsoft Identity Platform. The Microsoft Identity Platform is an external identity management service provided by Microsoft that provides SSO (single sign-on) via an authentication service (cloud hosted login facilities), open-source libraries (MSAL), and application management tools. It works with AAD to manage both user and application identities.
The AzureDev repository contains several component applications including a front-end named MvcApp, and a back-end named WebApi. These applications are built as single tenant Azure AD applications - all application level security is managed under a single Azure AD tenant named DTEK. While the application objects themselves are being hosted on a separate Azure AD tenant named Default Directory. To access protected areas, users must sign in. Note: the terms “sign in”, “sign on”, “log in” and “log on” are used interchangeably in this document.
6.2 Overview of Authentication as used in AzureDev
There are two levels of authentication: authentication of the user to allow access to the web app; and authentication of the web app to allow access to the web API. For user authentication, a sign-in/sign-out button is provided on MvcApp for users to optionally sign-in and sign-out. Upon sign-in, control is handed over to the Microsoft Identity Platform, which handles user authentication and issues an ID token. Whenever the sign-in button is clicked, MSAL (the Open ID Connect library) is used to direct the user to the Microsoft identity platform /authorize endpoint. Upon successful sign-on, an ID token is returned, and the user is directed to the web app’s /signin-oidc endpoint.
When the web app needs to access the web API, access tokens are used. Application authentication is based on ClientId and ClientSecret, which together authenticate the MvcApp to the Microsoft Identity Platform, which issues an access token to the MvcApp. Commonly, a web app authenticates with its application ID and either a certificate or secret, in order to obtain a token. This implements the OAuth 2.0 client credentials flow:

The client credential flow, which is more commonly used for daemon apps to access back-end APIs, was used instead of the on-behalf-of flow, which is more commonly used when there is a signed-in user. This was done so that all users from the DTEK tenant aren’t asked to grant permission to access back-end resources. Back-end permissions are granted only once by an administrator from the DTEK tenant. The first time MvcApp makes a call to WebApi, the user is directed to the /adminconsent endpoint. This is where an admin user from the DTEK tenant can grant the access_as_application permission for all DTEK tenant users. After the one-time grant is given, whenever any user from the DTEK tenant is signed-in to MvcApp, an access token can be acquired silently, using the authentication parameters contained in an instance of the API config class, allowing the MvcApp to make calls to the ApiApp. Managing what a user is allowed to do, is delegated to the front-end. The code that handles this can be found in the AzureDev repository in static helper classes named ApiAppAccess and ApimAccess
6.3 Overview of Authorization as used in AzureDev
All of the MVC front-end C# code blocks that make calls to the API are protected by attributes that specify the roles needed to enter the associated code blocks. The roles that are in effect are determined by the Microsoft Identity Platform when the user signs in. The Microsoft Identity Platform then communicates this information back to the application’s code by means of the ID Token. The API backend application code is further protected by a permission named access_as_application which must be present in the access token that accompanies calls to the API. This permission is passed to the MvcApp front-end application from the Microsoft Identity Platform by means of an access token. This token is then passed to the WebApi back-end by attaching it to the HttpClient authorization request header. In this way, the ID token and access token provide the roles and permissions needed to access protected application functionality and data.
By following several online tutorial examples, the roles ended up being named ProductViews and ProductAdministrators. These examples can easily be built upon and scaled up by creating more roles following any naming convention that works for the application. The way the roles were created and referenced in the source code serves as a how-to guide for future development.
In summary, currently AzureDev has two roles, ProductViews and ProductAdministrators, one permission, access_as_application, and four security principals, NewGuy, Tester, Admin, MvcApp.
| Security Principal | ProductViewers | ProductAdministrators | access_as_application |
|---|---|---|---|
| Newguy | |||
| Tester | YES | ||
| Admin | YES | YES | |
| MvcApp | YES |
6.4 Implementation of Authentication for AzureDev/MvcApp
The application’s front-end is a .NET Core MVC Web app that uses OpenID Connect to sign in users. It leverages the ASP.NET Core OpenID Connect middleware. [1]

Instead of a custom AccountController to handle the sign-in and sign-out requests, the Microsoft.Identity.Web.UI built-in one is used. This is done in MvcApp.Startup.ConfigureServices() by adding three services:
- Add authentication using the OpenID Connect default authentication scheme, linking it to the service principal which was registered in the DTEK tenant. The service principal is identified in the “AzureAd” configuration section.
- Add controllers with views with an authorization policy filter.
- Add razor pages with the Microsoft Identity UI.
public void ConfigureServices(IServiceCollection services)
{
    services.AddAuthentication(OpenIdConnectDefaults.AuthenticationScheme)
        .AddMicrosoftIdentityWebApp(Configuration.GetSection("AzureAd"));

    services.AddControllersWithViews(options =>
    {
        var policy = new AuthorizationPolicyBuilder()
            //.RequireAuthenticatedUser() // Unauthenticated users may access those parts of the website that haven't been secured.
            .RequireAssertion(a => true)
            .Build();
        options.Filters.Add(new AuthorizeFilter(policy));
    });
    services.AddRazorPages()
          .AddMicrosoftIdentityUI();
}
Authentication and authorization are added to the HTTP request pipeline in MvcApp.Startup.Configure() as follows:
app.UseAuthentication();
app.UseAuthorization();
Having done this, the parts of the front-end application that need to be secured can then have their controllers and/or individual controller actions decorated with the [Authorize] family of attributes. For example:
namespace MvcApp.Controllers
{
  [Authorize]
  public class SimpleDataController : Controller
  {
    // controller code goes here...
  }
}
6.5 Implementation of Authorization for AzureDev/MvcApp
An authenticated (logged in) user’s ability to access functionality in the MvcApp is managed using roles. The Web app allows users to sign in, and it uses app roles to control what the users can do.
App roles for MvcApp are managed at the service principal level. This is done from the Portal by going into the DTEK tenant, and locating MvcApp among the registered applications. The MvcApp service principal, the MvcApp representation in the DTEK tenant, can be managed by editing the application’s Manifest json file. In the Manifest, app roles are represented as follows:
"appRoles": [
  {
    "allowedMemberTypes": [ "User" ],
    "description": "Administrator role for Product Catalog web application.",
    "displayName": "ProductAdministrators",
    "id": "XXXXXXXX-XXXX-XXXX-XXXX-XXXXXXXXXXXX",
    "isEnabled": true,
    "lang": null,
    "origin": "Application",
    "value": "ProductAdministrators"
  },
  {
    "allowedMemberTypes": [ "User" ],
    "description": "Viewer role for Product Catalog web application",
    "displayName": "ProductViewers",
    "id": "YYYYYYYY-YYYY-YYYY-YYYY-YYYYYYYYYYYY",
    "isEnabled": true,
    "lang": null,
    "origin": "Application",
    "value": "ProductViewers"
  }
Where “id” values are uniquely generated GUIDs. The following PowerShell will generate a new GUID:
New-Guid
Assigning users to app roles can most easily be done from the Azure Active Directory admin center. From the DTEK Tenant navigate to the All Services, Enterprise Applications and select MvcApp. From the menu under the Manage section, choose Users and Groups, and then choose + Add Role.

On the Add Assignment pane, choose Role. Choose the role to apply to the selected users or groups.

With the user/role assignments in place, you can protect sections of source code using the Authorize attribute with Roles parameters as follows:
namespace MvcApp.Controllers
{
    [Authorize(Roles = ("ProductViewers,ProductAdministrators"))]
    public class CompoundDataController : Controller
    {
      // more code...
6.6 Securely Calling AzureDev/WebApi
The WebApi back-end is locked down and can only be accessed by callers bearing an access token which must contain a permission named access_as_application. Roles are used to protect the front-end code that accesses the back-end. It is this protected code that acquires the access token which bears the necessary permission to access the back-end. This permission is implemented using an “app role” called access_as_application. The web app itself is initially granted permission to access the API by the DTEK tenant administrator.
The app role can be created from the portal by navigating to the app registration for the WebApi app, and choosing Manage/App roles from the menu. And then choosing + Create app role.

Provide a Display name. Under Allowed member types select Applications. Provide a value, a description, and tick the box labelled “Do you want to enable this app role”.
If you look in the application’s Manifest, you will see this newly created app role as follows:
	"appRoles": [
		{
			"allowedMemberTypes": [
				"Application"
			],
			"description": "Accesses the API as an application.",
			"displayName": "access_as_application",
			"id": "XXXXXXXX-XXXX-XXXX-XXXX-XXXXXXXXXXXX",
			"isEnabled": true,
			"lang": null,
			"origin": "Application",
			"value": "access_as_application"
		}
	],
By setting “allowedMemberTypes” to “Application” we limit API access to applications. Since AzureDev is built on the single tenant model, applications must be registered with the DTEK AAD tenant in order for them to have access to the API.
6.7 Security and FTP Access
Windows File Explorer can be pointed directly at the application’s online filesystem using FTP. To obtain the URL and credentials from the portal, navigate to the App Service Overview and choose “Get publish profile”. A text file named .PublishSettings is downloaded. In this file, locate the publishProfile element with publishMethod=“FTP”. You will need the publishUrl, userName, and userPWD attributes. Open a new instance of Windows File Explorer, and paste the publishUrl attribute into the address bar. A “Log On As” prompt appears where you can enter the userName and userPWD attributes for the User name and Password fields respectively.
6.8 Security and Application Log File Access
When downloading the application’s log files, you may be prompted for username and password credentials. Make sure to use credentials that are linked to the Azure subscription connected to the application.
6.9 Security and .NET Core Development Computers
Installing the .NET Core SDK on a computer intended for development work, installs the ASP.NET Core HTTPS development certificate to the local user certificate store. To trust the certificate run ‘dotnet dev-certs https --trust’ (Windows and macOS only). The certificate store can be managed with the Windows certmgr.msc tool.
Development computers also require a trusted root certificate to access the development database (see below).
6.10 Security and Database Access
There are two notable security mechanisms for the Cosmos DB database.
- the primary key (all environments)
- the trusted root certificate (needed for the Cosmos DB Emulator - dev/test environment only)
Primary Key
The default primary key may be used locally on the internal network as long as the Cosmos DB Emulator host computer is secure. The default primary key is:
C2y6yDjf5/R+ob0N8A7Cgv30VRDJIWEHLM+4QDU5DE2nQ9nDuVTqobD4b8mGGyPMbIZnqyMsEcaGQy67XIw/Jw==
Online, in Azure, the primary key for Cosmos DB is found in the Azure console at Azure Cosmos DB account > Settings > Keys

Trusted Root Certificate
To access certificates, right-click Windows Start and select Run. Enter the following command.
certmgr.msc
On the CosmosDb emulator host computer, the CosmosDb Emulator installer automatically creates and installs a certificate identified by the Friendly Name DocumentDbEmulatorCertificate.

To allow access to the emulator from client computers on the same internal network, this certificate must be exported from the host computer and imported into the client computer using the certmgr.msc tool. And the Cosmos Db Emulator should be started on the host computer as follows (Powershell)
cd "C:\Program Files\Azure Cosmos DB Emulator"
.\Microsoft.Azure.Cosmos.Emulator.exe /AllowNetworkAccess  /Key=<KEY>
where <KEY> is replaced by the Cosmos DB Emulator’s Primary Key.
6.11 Security and Function Apps
Function apps are secured using function keys. Each individual function within the function app has its own function key which can be found by navigating to rob-das-function-app > Functions > [click the desired function] > Developer > Function Keys
6.12 Security and Storage Accounts
Storage accounts are needed by the function apps. rob-das-function-app accesses the ridstorage storage account using the storage account’s connection string, which is stored by the function app as an application setting called AzureWebJobsStorage. This can be found at rob-das-function-app > Settings > Configuration > Application setting > AzureWebJobsStorage
6.13 Update 2022-Nov-03 Key Vault
All secrets, keys, and connection strings were moved into the AzureDevKV key vault in November of 2022. See the Azure Key Vault section of this document for details.
6.14 Update 2024-Aug-17 Authenticator App
Microsoft now requires at least one user to install the Microsoft Authenticator app. At the time of this writing, if you try to sign in on a Windows computer and you are one of the users required to sign in with the Authenticator app, the sign in logic embedded in Microsoft’s sign in page tries to force you to install the Autheticator app by redirecting you to a page that only has installers for android and iphone, and the sign in process is unable to continue on Windows computers. The default is for All Users to require the Authenticator app to sign in. To get around this, a designated user was created. The setting was changed from “All Users” to specific users, and the designated user was selected. By doing this, all other users can sign in from a browser in windows. The designated user can only sign in from the exact phone where Authenticator is installed and verified by Microsoft. This work around was discovered here:

7. Remote Debugging
This section describes how to do remote debugging from Visual Studio 2019 and 2022.
Using Visual Studio 2019
Publish the application to Azure using the Debug configuration. Then from within Visual Studio 2019, view the Cloud Explorer, right-click on the
App Service instance and choose Attach Debugger.

Using Visual Studio 2022
Sadly the Visual Studio 2019 Cloud Explorer is no more. Attaching a debugger is a little more complicated with Visual Studio 2022.
- From the Azure app service, enable remote debugging.

- Publish app from Visual Studio 2022 using Debug configuration.
- From Visual Studio 2022 publish settings, hosting section dot dot dot (…) menu, choose Attach Debugger.

8. Application Logging
This section describes how application logging is set up.
8.1 From the Portal
Application logging is managed for the application object (for example MvcApp) at the App Service level. In the portal, under the tenant where the
App Service was created, scroll down to Monitoring and choose App Service logs.

To enable app logging to the Web app’s file system, set Application logging (Filesystem) to On, and then set the Level to Error, Warning, Information,
or Verbose. Logging to the file system will be automatically reset to Off after 12 hours.
After configuring the logs, select Save.
8.2 From the CLI
To enable app logging from the rob-das-win app to the file system, run this command.
az webapp log config --application-logging true --level verbose --name rob-das-win --resource-group rob-das-rg
There is currently no way to disable application logging by using Azure CLI commands; however, the following command resets file system logging to error-level only.
az webapp log config --application-logging false --name rob-das-win --resource-group rob-das-rg
To view the current logging status for an app, use this command.
az webapp log show --name rob-das-win --resource-group rob-das-rg
8.3 Code Changes
To add logging capability to the code requires adding a NuGet package, and modifying the Program.cs file to configure logging as part of creating the application host builder.
Add NuGet package Microsoft.Extensions.Logging.AzureAppServices.

Modify Program.cs as follows
using Microsoft.AspNetCore.Hosting;
using Microsoft.Extensions.Hosting;
using Microsoft.Extensions.Logging;


namespace MvcApp
{
    public class Program
    {
        public static void Main(string[] args)
        {
            CreateHostBuilder(args).Build().Run();
        }

        public static IHostBuilder CreateHostBuilder(string[] args) =>
            Host.CreateDefaultBuilder(args)
                .ConfigureLogging(logging =>
                {
                    logging.ClearProviders();
                    logging.AddAzureWebAppDiagnostics();
                    logging.AddDebug();
                    //logging.AddConsole();
                    //logging.AddEventSourceLogger();
                    //logging.AddEventLog();
                })
                .ConfigureWebHostDefaults(webBuilder =>
                {
                    webBuilder.UseStartup<Startup>();
                });
    }
}
This provides the necessary pieces to perform logging anywhere in the application (except the Startup.cs file - see below). With these pieces in place, all we need to do is get a logger, using dependency injection, and we can use it immediately. For example, in the home controller we could get and use a logger immediately in the constructor.
public class HomeController : Controller
{
    private readonly ILogger<HomeController> _logger;

    public HomeController(ILogger<HomeController> logger)
    {
        _logger = logger;
        _logger.LogError("*** HOME CONTROLLER TEST " + DateTime.Now);
    }

  // other code...
The code in Startup.cs is called and runs before Program.Main() has had a chance to build and run the host builder, so a bit more work is needed if you want to add logging to the Startup class. To add logging to Startup, in the Startup constructor, build a separate service collection and add logging to it. Then you can get a logger from the service collection and use it immediately. For example
public class Startup
{
   readonly ILogger _logger;
   public Startup()
   {
       _logger = new ServiceCollection()
               .AddLogging(config =>
               {
                   config.ClearProviders();
                   config.AddAzureWebAppDiagnostics();
                   config.AddDebug();
                   //config.AddConsole();
                   //config.AddEventSourceLogger();
                   //config.AddEventLog();
               })
               .AddTransient<Startup>()
               .BuildServiceProvider()
               .GetService<ILogger<Startup>>();
       _logger.LogError("*** STARTUP TEST " + DateTime.Now);
   }

   // other code
Update
Logging has been removed from Startup in order to keep things as simple as possible. Although this code has been tested and shown to work, it doesn’t add much value. If in future there is a need for logging in the Startup classes, this code can be added.
8.4 Live Log Streaming
Live log streaming is an easy and efficient way to view live logs for troubleshooting purposes. To use live logging, you connect to the live log service from the
command line, and can then see text being written to the app’s logs in real time.
To open the log stream, run the following command.
az webapp log tail --name rob-das-win --resource-group rob-das-rg
To stop viewing live logs, press Ctrl+C.
8.5 Downloading the Log Files
For logs stored in the App Service file system,[9] the easiest way to get at them is to download the ZIP file in the browser at:
https://<app-name>.scm.azurewebsites.net/api/dump
For Windows apps, the ZIP file contains the contents of the D:\Home\LogFiles directory in the App Service file system.
Note: you must log in with an account that is linked to the subscription on the App Service or you will get an access denied error. The global administrator account for the Default Directory has been tested and confirmed to work. Users from the DTEK tenant have been tested and were unable to download the logs (access denied). Other Default Directory users have not been tested
| Log type | Directory | Description |
|---|---|---|
| Application logs | /LogFiles/Application/ | Contains one or more text files. The format of the log messages depends on the logging provider you use. |
| Failed Request Traces | /LogFiles/W3SVC#########/ | Contains XML files, and an XSL file. You can view the formatted XML files in the browser. |
| Detailed Error Logs | /LogFiles/DetailedErrors/ | Contains HTM error files. You can view the HTM files in the browser. |
| Web Server Logs | /LogFiles/http/RawLogs/ | Contains text files formatted using the W3C extended log file format [9] App Service doesn’t support the s-computername, s-ip, or cs-version fields. |
| Deployment logs | /LogFiles/Git/ and /deployments/ | Contain logs generated by the internal deployment processes, as well as logs for Git deployments. |
Another way to view the failed request traces is to navigate to your app page in the portal. From the left menu, select Diagnose and solve problems, then search for Failed Request Tracing Logs, then click the icon to browse and view the trace you want.
Web server logs (in /LogFiles/http/RawLogs) can be read using a text editor or a utility like Log Parser. [9]
9. FTP Access
Windows File Explorer can be pointed directly at the application’s online filesystem using FTP. To obtain the URL and credentials from the portal, navigate to the App Service Overview and choose “Get publish profile”.

A text file named <app-name>.PublishSettings is downloaded. In this file, locate the publishProfile element with publishMethod=“FTP”. You will need the publishUrl, userName, and userPWD attributes. Open a new instance of Windows File Explorer, and paste the publishUrl attribute into the address bar. A “Log On As” prompt appears where you can enter the userName and userPWD attributes for the User name and Password fields respectively. Then click the Log On button.

10. Kudu Interface
To manage the web app using Kudu, add .scm to the URL after the app name. For example, the webapp accessible at https://rob-das-win.azurewebsites.net and the kudu interface can be access in a browser by inserting .scm after rob-das-win as follows: https://rob-das-win.scm.azurewebsites.net

11. MVC Layout File Hierarchy
The single _Layout.cshtml file that is part of the C# solution scaffolded by dotnet has been refactored and replaced by a hierarchy of layout files augmented with partial views. The intent is to provide the flexibility to include multiple different HTML base pages within the same MVC application. This makes it possible to support things like having different, and potentially conflicting, meta tags and attributes in parts of the HTML that can only appear once, such as the document’s body tag or the head element.
For example, we may add a custom view that uses the same common elements but has its own body tag.
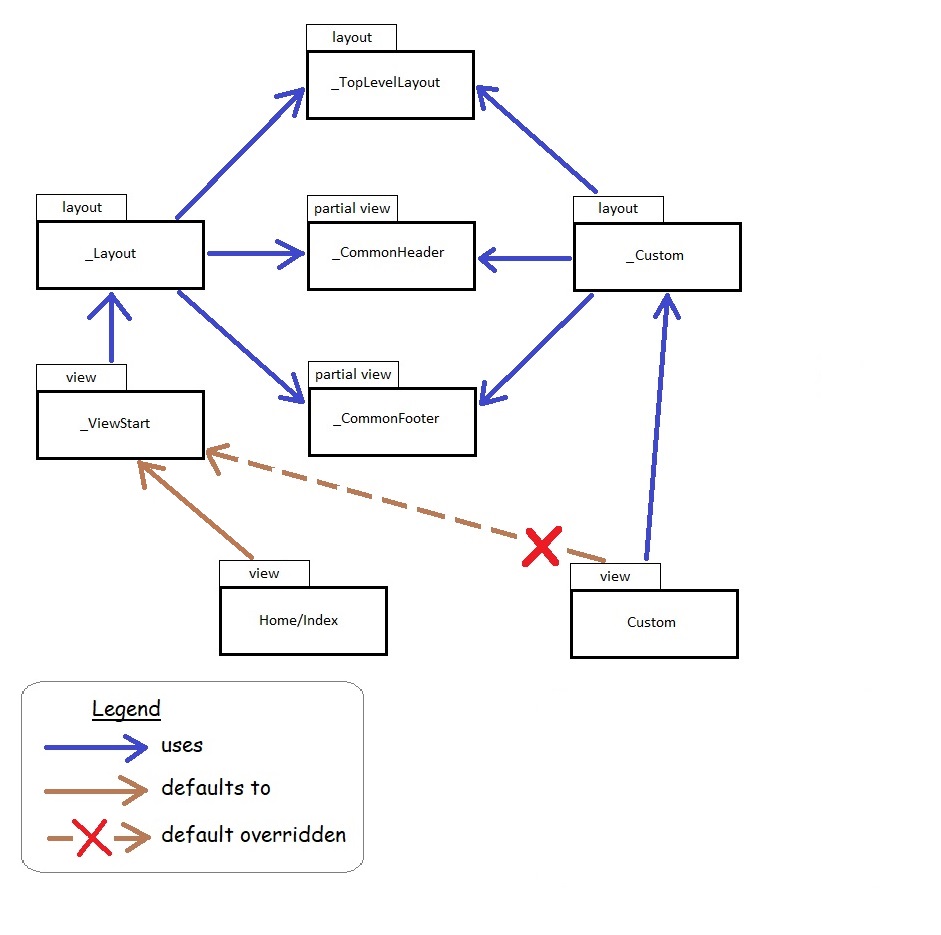
In this example, the custom view does not default to the well known _ViewStart layout. Instead, it uses its own custom layout, but it still uses the common top level, header and footer components, while replacing the default layout body tag with its own body tag, defined in its own custom layout.
12. Admin Procedures
This section describes the manual steps for the ongoing operational support procedures of AzureDev. Where possible, these procedures should be automated (future enhancements?)
12.1 Replacing an Expired Application Client Secret
An application client secret is used by the MvcApp web application to authenticate itself to Microsoft identity and access the WebApi application. When the client secret is created, an expiration date has to be set which cannot be more than 24 months into the future. When the secret expires it cannot be renewed, it must be replaced by a new secret. The new secret is created in the “DTEK” AAD tenant and must be copied immediately, because it cannot be retrieved later. It must then be distributed to three places: online in Azure, on the developer’s computer secrets.json file, and in the backup folder S:\Code\Secrets
Here are the steps:
- Login to the Azure Portal and switch to the “DTEK” AAD tenant.
- Navigate to Microsoft Entra ID > Manage > App registrations
- Choose MvcApp
- Navigate to Manage > Certificates & secrets > Client secrets > + New client secret.
- Name the secret MvcApp Secret + current date, for example “MvcApp Secret 2022-Aug-08”.
- Choose the maximum duration from the select-list.
- Click Save. When it has been saved, the portal will display the value of the newly created secret. Copy the value immediately because it cannot be retrieved later.
- Switch to the “DEFAULT DIRECTORY” AAD tenant.
- Navigate to key vault > AzureDevKV > Objects > Secrets
- Choose ApiAuthenticationClientSecret
- In the secret’s detail page, you will see the current versions of the secret. Click on the “New Version” button or a similar option (this might be a “+ Generate/Import” button depending on the UI changes).
- Enter the new value for the client secret in the “Value” field and configure effective/expiry dates for the old and new versions appropriately (this is the first of three places where the new secret must be distributed).
- If key vault creates a new secret identifier for the new version of ApiAuthenticationClientSecret, then the secret identifier must be replaced in the Web App. Navigate to App Services > rob-das-win > Settings > Environment variables, and choose ApiAuthentication:ClientSecret. Replace the value with a reference to the new key vault secret identifier. For Azure key vault reference syntax, see the Azure Key Vault chapter of this document.
- The secret must now be distributed to two other places.
- On the developer’s computer, in Visual Studio, right-click the MvcApp project and choose Manage User Secrets
- In the secrets.json file, locate the entry for ApiAuthentication.ClientSecret and paste the value of the newly created secret (this is the second of three places where the secret must be distributed)
- Update the MvcApp.Secrets.txt backup file found in the S:\Code\Secrets folder (this is the third of three places where the secret must be distributed)
- Test and verify that the MvcApp web application can still access the WebApi API online.
- Test and verify that the MvcApp web application can still access the WebApi API when run locally on the developer’s computer.
12.2 Updating the Documentation
This README document is published in two places, in two different formats: README.md which serves as documentation in the private Azure DevOps Repos source code repo for AzureDevApp; and README.html which serves as the online documentation that is published in Azure as part of the MVC front-end application and is publicly viewable.
In order to keep the documents synced, it is necessary to follow a formal procedure every time the documentation is updated. The procedure is as follows:
- Pull the latest version of README.md from the AzureDevApp repository in Azure DevOps.
- Make the required documentation update by editing the README.md file on the local computer using a tool such as VS Code.
- Load The updated README.md file into an online conversion tool such as StackEdit and then use the tool’s export facility to produce an equivalent HTML file. Use the “Styled HTML with TOC” template.
- Copy the contents of the exported html into the README.html file that exists in the wwwroot/html folder in the MvcApp dotnet project on the local computer. Important: remember to save your changes before moving to the next step!
- The online conversion tool has difficuly with some things. A powershell script in the scripts folder named Format-ReadmeHtml.ps1 is provided that will make the necessary corrections. After copying the exported html as described in the previous step, run the Format-ReadmeHtml.ps1 script on the local computer.
- Commit and push the latest version of the readme.html back to the AzureDevApp remote repository.
- Run the AzureDevApp CI/CD pipeline in Azure DevOps to deploy the latest version of the readme.html file to the application running in Azure.
13. AzureDev DNS Routing
The default domain name issued by Azure, [MvcApp application object name].azurewebsites.net, is a bit of a mouthful and hard to remember. Initially it was hoped that the domain azuredev.ca would be added to the AzureDev app service as a custom domain, and thereby serve as the root URL for the entire AzureDev project. While this is in fact possible, it requires upgrading from the free tier to the production tier, which could potentially create a massive hole in the ZERO DOLLAR AzureDev project budget. Further research and testing is needed to verify that the cost of the production tier can be monitored, and limited or capped. Until then, azuredev.ca will continue to point at the static IP hosted on-premises by the aging web server. The on-prem web server has been modified to intercept azuredev.ca requests and use HTTP 308 redirection to send the request to Azure.
More work is needed.
Update October 10, 2022
Further testing has shown that the domain registrar, Godaddy, provides the ability to handle redirection, thereby relieving the on-prem web-server from the responsibility of handling requests for azuredev.ca
After logging into the domain registrar’s site, navigate to My Account > My Products > DNS Management > Forwarding
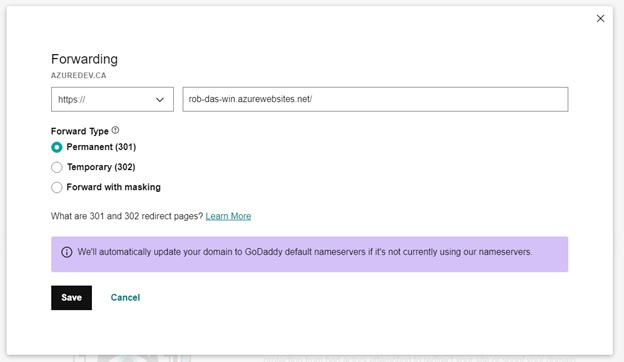
A permanent 301 forward type is used, instead of an HTTP 308 redirect.
14. Azure Key Vault
In order to store the growing collection of secrets, separately from the application code, an Azure key vault was created. The Azure Key Vault for the AzureDev project is named AzureDevKV.
The implementation of AzureDevKV proceeded as follows:
- From the Azure Portal, log into the Default Directory. This directory has a valid Azure subscription and is used to host the services for AzureDev.
- From the home screen, choose Create a resource > Key Vault and follow the wizard steps to create the key vault
- From the home screen, select the application service that will access the key vault and turn on the system assigned managed identity
- From the home screen, select the key vault > Access policy > + Create
- Add permissions ‘Get’ and ‘List’
- Add the service principal that represents the application that will access the key vault
- Move the secrets from the application service’s Settings > Configuration > Application settings into the key vault’s Objects > Secrets
- Replace the values of the secrets in the Application Settings with references to the secrets stored in the key vault, using the proper reference syntax.
Note: the secretUri for any specific secret is obtained from the home screen > key vault > secrets > select the specific secret > Secret Identifier
The application code that previously used the secrets directly from the application settings does not need to be changed because Azure automatically replaces the reference syntax with the actual values from the key vault at run time. Also, since the application is now using a system assigned managed identity and the key vault now has an access policy that explicitly grants the List and Read permissions to the application’s managed identity, no secret value is needed by the application code to obtain the secrets from the key vault.
Key Vault Access Policy
A Key Vault access policy determines whether a given security principal, namely a user, application or user group, can perform different operations on Key Vault secrets, keys, and certificates.
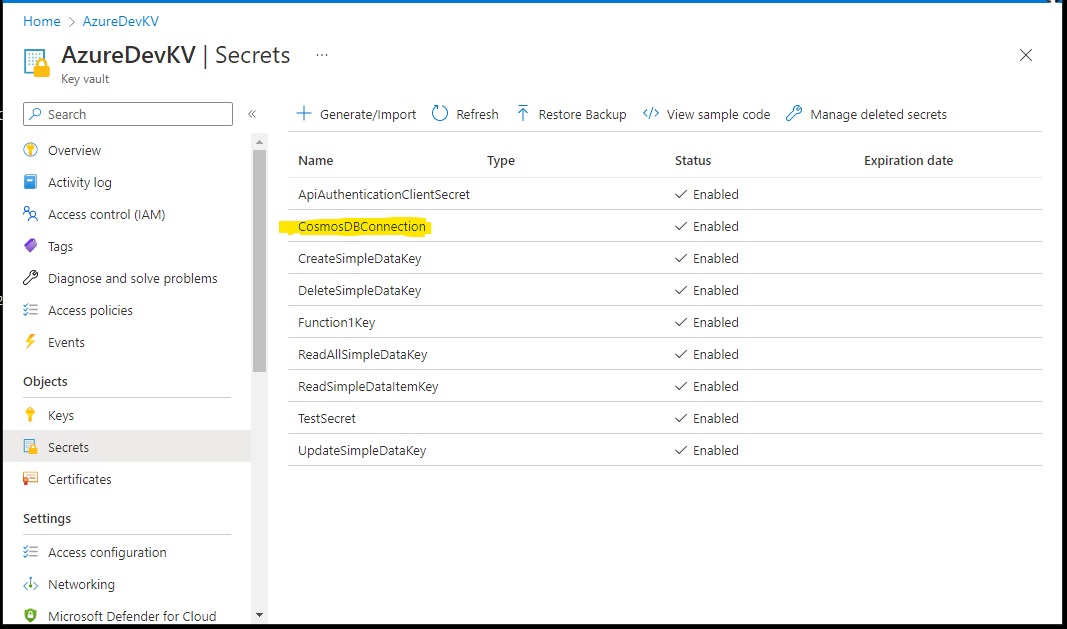
Key Vault and Azure Function Parameters
The secret used by the Azure functions in the FunctionApp application is the database connection string. It is referenced from the function parameter attributes by the name CosmosDBConnection. For example:
[FunctionName("CreateSimpleData")]
public static IActionResult Run(
    [HttpTrigger(AuthorizationLevel.Function, "post", Route = null)] HttpRequest req,
    [CosmosDB(
	databaseName: "azuredev",
	collectionName: "simpledata",
	ConnectionStringSetting = "CosmosDBConnection")]out dynamic document,
    ILogger log)
{
    // function code here...
}
There are two versions of this connection string: the local version and the online version.
The local version of the connection string is not stored in the key vault. It points to a Cosmos DB emulator running on a local server which is used for dev/test purposes only and is protected within the on-prem network. It uses a well known default connection string because it only contains test data and is adequately protected behind the firewall.
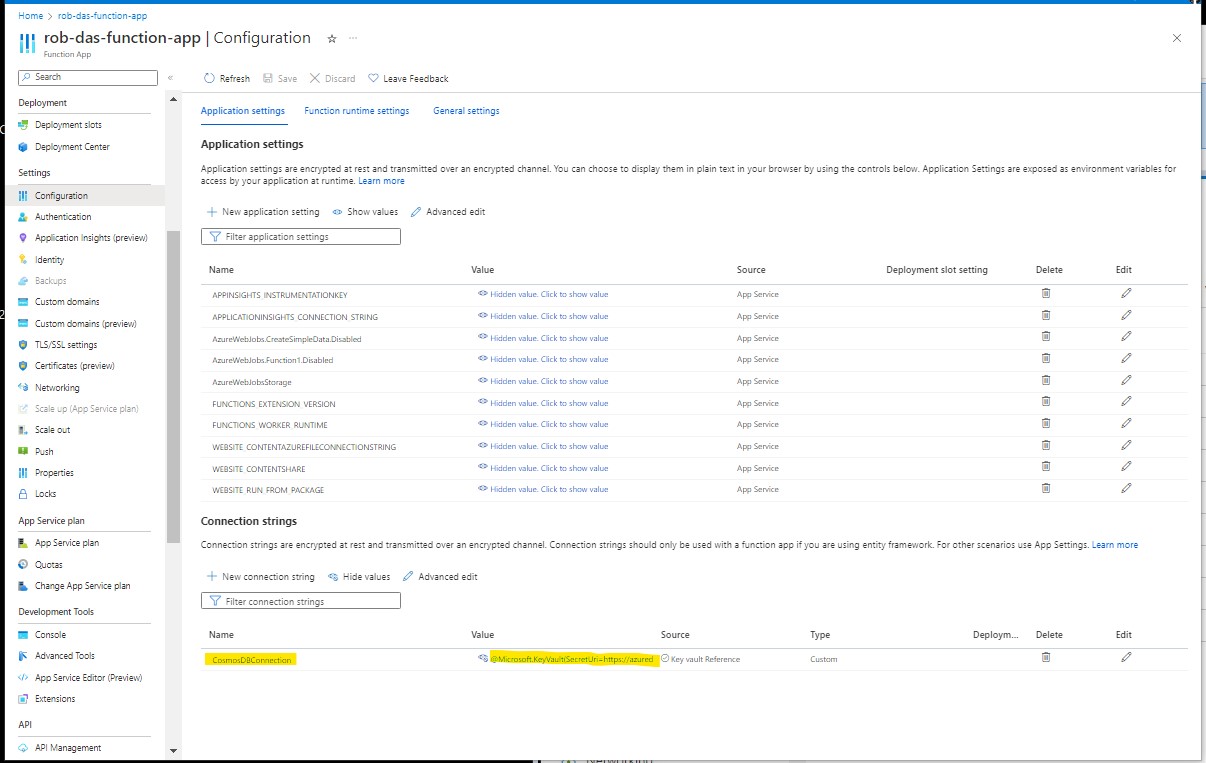
The online version of the connection string is now stored in the key vault in the same way as the other secrets.
However the online configuration explicitly uses a connection string instead of an application setting. Presumambly this is how the function parameter binding mechanism expects to find connection strings. The value of the function configuration’s connection string follows the same reference syntax.
Azure Key Vault Reference Syntax
A Key Vault reference is of the form
@Microsoft.KeyVault({referenceString})
where {referenceString} is replaced by SecretUri=secretUri, where secretUri is the full data-plane URI of a secret in Key Vault. For example the Cosmos DB connection string appears in the function app configuration connection string as
@Microsoft.KeyVault(SecretUri=https://azuredevkv.vault.azure.net/secrets/CosmosDBConnection/cd66...)
In this example, the secret URI is the Cosmos DB Primary Connection String, which can be found in the Azure Portal home > Cosmos DB account > Settings > Keys
Azure Key Vault Migration from App Settings (November 2022)
The following table shows how secrets are stored locally, remotely, and in the AzureDevKV key vault:
| App | Secret | Local | Remote | Vault Secret Name | Expires |
|---|---|---|---|---|---|
| FunctionApp | AzureWebJobsStorage | rob-das-function-app > Configuration > AzureWebJobsStorage | RidStorageConnection | ||
| FunctionApp | CosmosDBConnection | local.settings.json > CosmosDbConnection | rob-das-function-app > Configuration > Connection strings | CosmosDbConnection | |
| MvcApp | AzureAd:ClientId | secrets.json | rob-das-win > Configuration > App Settings | ||
| MvcApp | AzureAd:TenantId | secrets.json | rob-das-win > Configuration > App Settings | ||
| MvcApp | ApiAuthentication:TenantId | secrets.json | rob-das-win > Configuration > App Settings | ||
| MvcApp | ApiAuthentication:ClientId | secrets.json | rob-das-win > Configuration > App Settings | ||
| MvcApp | ApiAuthentication:ClientSecret | secrets.json | rob-das-win > Configuration > App Settings | ApiAuthenticationClientSecret | 2024-Aug-05 |
| MvcApp | ApiAuthentication:Scope | secrets.json | rob-das-win > Configuration > App Settings | ||
| MvcApp | Apim:ApimFunctionAppSubscriptionKey | secrets.json | rob-das-win > Configuration > App Settings | ApimFunctionAppSubscriptionKey | |
| WebApi | AzureAd:ClientId | secrets.json | rob-das-api > Configuration > App Settings | ||
| WebApi | AzureAd:TenantId | secrets.json | rob-das-api > Configuration > App Settings | ||
| WebApi | FunctionApp:CreateSimpleDataKey | secrets.json | rob-das-api > Configuration > App Settings | CreateSimpleDataKey | |
| WebApi | FunctionApp:DeleteSimpleDataKey | secrets.json | rob-das-api > Configuration > App Settings | DeleteSimpleDataKey | |
| WebApi | FunctionApp:Function1Key | secrets.json | rob-das-api > Configuration > App Settings | Function1Key | |
| WebApi | FunctionApp:ReadAllSimpleDataKey | secrets.json | rob-das-api > Configuration > App Settings | ReadAllSimpleDataKey | |
| WebApi | FunctionApp:ReadSimpleDataItemKey | secrets.json | rob-das-api > Configuration > App Settings | ReadSimpleDataItemKey | |
| WebApi | FunctionApp:UpdateSimpleDataKey | secrets.json | rob-das-api > Configuration > App Settings | UpdateSimpleDataKey | |
| WebApi | CosmosDBConnection | secrets.json | rob-das-api > Configuration > App Settings | CosmosDbConnection |
As can be seen here, secrets named TenantId and ClientId are not in the key vault. TenantId and ClientId are repeated multiple times and they have different values.
This needs to be addressed. Distinct names should be used and the source code needs to be updated to use the correct, distinctly renamed, versions of TenantId and ClientId.
15. AzureDev API Management (APIM)
This section describes AzureDev’s use of APIM.
15.1 Create the APIM
By following the tutorial at
https://learn.microsoft.com/en-us/azure/api-management/import-and-publish#-import-and-publish-a-backend-api
an APIM was created for AzureDev using the following Azure CLI command.
az apim create --name azuredevapim --publisher-email xyz@email.com --publisher-name AzureDev --resource-group rob-das-rg --location canadacentral --sku-name Consumption
15.2 Add an API
An API was created (imported) from the rob-das-function-app using the Azure Portal by importing the function app as follows:

This brings up the “Create from Function App” dialog:

The API was named azuredev-functionapp-api and the display name was set to “AzureDev Functionapp API”. More settings can be found through the Azure Portal at All Resources > azuredevapim > APIs > APIs > {API name} > Settings tab.
15.3 Create the Subscription
In order to call the operations from azuredev-functionapp-api, an APIM subscription was created named azuredevapimsubscription (display name: AzureDev APIM Subscription). The APIM subscription was scoped to the azuredev-functionapp-api. The APIM subscription primary and secondary keys can be seen here:

To call the functions from this API via the subscription, pass the key using either the query string or the request header as follows:
- from query string use subscription-key
- from request header use Ocp-Apim-Subscription-Key
The syntax for the endpoint URL to call one of the API operations using the query string to pass the APIM subscription key is as follows:
https://{APIM-name}.azure-api.net/{api-url-suffix}/{operation-name}?subscription-key={key}
Now that the Function App is available through the API, the WebApi application is effectively obsolete. However since the WebApi application counts toward the limit of 10 free apps that can be created in the rob-das-win-plan app service plan, we’ll keep it around until we need to create another free API, and then we’ll just repurpose it.
The final step was to refactor the front end to access the simple data using the APIM instead of the WebApi.
16. AzureDev Next Release
Thanks for all the ideas, please keep them coming. For now, I will create a backlog of tasks.
Update 2023-Apr-29
This backlog has now been moved to Azure DevOps Boards, and will no longer be managed here. See “AzureDev in Azure DevOps” below for details.
This backlog is being kept as-is for historical purposes.
Backlog
| Feature | Desc. | Status | Comment |
|---|---|---|---|
| Azure Key Vault | design, implement, test, deploy | COMPLETED | AzureDev 4.1.1.0 |
| Production Release Budget | unless there is an approved budget, the business cannot approve a production implementation | COMPLETED | see: Operating Budget |
| APIM | create an APIM instance - refactor AzureDev to make use of APIM | COMPLETED | AzureDev 4.1.1.3 |
| Update WebApi to .NET 6 | Update the webapi to .NET 6 in order to facilitate EF Core 6 implementation | COMPLETED | AzureDev 4.1.1.6 |
| EF Core Azure Cosmos DB Provider | Implement compound data model storage in Cosmos DB using EF Core | COMPLETED | AzureDev 4.1.2.0 |
| Frontend framework | examples: angular, react, vue | IN PROG | Low Priority - researching options |
| Update MvcApp to .NET 6 | This is the last remaining component of AzureDev that is still built on .NET 5 | NEW | |
| Issue Tracking System | This backlog should be moved to an issue tracking system such as Azure DevOps or GitHub | COMPLETED | See: AzureDev in Azure DevOps |
| Documentation Rewrite | The readme file was originally written to document AzureDev at a point in time. AzureDev has changed and it is proving difficult to update the documentation to accurately reflect the current state of the project. This readme file needs to be rewritten as a living document. | NEW | |
| New Roles | employee, visitor - add role checks to code - update test plans | NEW | |
| Containers | Look into possible use of container systems such as Docker. Can any AzureDev component(s) be hosted (terminology?) in Containers. Cost? High level component architecture. Would it need to interface with other AzureDev components? | NEW | |
| Build Pipeline | Create an Azure DevOps build pipeline for the azuredev project | NEW | |
| Release Pipeline | Create an Azure DevOps release pipeline for the azuredev project | NEW | |
| Domain Name | select, register, implement, deploy | STALLED | see: AzureDev DNS Routing |
17. AzureDev in Azure DevOps
The “Issue Tracking System” backlog item was completed by moving the list of new features to the Azure DevOps Boards. An Azure DevOps organization named dtek-consulting-services was created for the the company, DTEK Consulting Services Ltd. In this organization, an Azure DevOps project was created name azuredev. In order to address the “Issue Tracking System” backlog item, in the AzureDev Next Release section of this document, all items except those with a status of COMPLETED, were created as issues in the azuredev Azure DevOps project board.
The table of backlog tasks seen above in this document will be left in its current state for historical purposes, to document the current state of the azuredev project task backlog, up to the point in time that it was created in Azure DevOps.

The above screenshot shows the state of the Azure DevOps Boards for the azuredev project as of this date (2023-Feb-28).
After moving the backlog of tasks to Azure DevOps Boards, and while researching Azure DevOps, it was decided that an Azure DevOps CI/CD pipeline would be a better choice than using the publish wizard in Visual Studio 2022. A YAML based CI/CD pipeline named AzureDevApp was developed. The AzureDev codebase was then moved from GitHub to Azure DevOps Repos to keep everything together and to leverage the integration of the various components of Azure DevOps. Although it is possible to link the CI/CD pipeline to GitHub, it was easier to put everything in one toolset, Azure DevOps. There are still top level Azure DevOps components, Test Plans and Artifacts, that have not been explored. Making use of these resources may be the focus of future releases of the AzureDev apps. Stay tuned…
18. Operating Budget
As of 2022-Nov-13, the operating budget has been created as described in this section. First we compiled an inventory of resources that are potentially billable. Next we used the online Azure Pricing Calculator at https://azure.microsoft.com/en-us/pricing/calculator/ . Finally we used the estimates from the online pricing calculator to create a reasonable monthly budget amount, and we created an online budget for the project in the default directory, where all the billable resources are kept.
Inventory
To find all the billable resources from the Azure Portal default directory, navigate to Home > All resources.
| Name | Type | Resource group | Location |
|---|---|---|---|
| rob-das-api | App Service | rob-das-rg | Central Canada |
| rob-das-win | App Service | rob-das-rg | Central Canada |
| ASP-robdasrg-8976 | App Service Plan | rob-das-rg | Central Canada |
| rob-das-win-plan | App Service Plan | rob-das-rg | Central Canada |
| free-tier-cosmos-db-account | Azure Cosmos DB account | learning | Central Canada |
| robdasb2c.onmicrosoft.com | B2C Tenant | rob-das-rg | United States |
| rob-das-function-app | Function App | rob-das-rg | Central Canada |
| AzureDevKV | Key vault | rob-das-rg | Central Canada |
| DefaultWorkspace-… | Log Analytics workspace | DefaultResourceGroup-CCAN | Central Canada |
| ridstorage | Storage account | learning | Central Canada |
| azuredevapim | API management | rob-das-rg | Central Canada |
Cost Estimates
By navigating to each resource one-by-one, we can use the resource overview and other resource properties, to get the info we need for the Azure pricing calculator. We use the Type of each resource, in the pricing calculator “Search products” search box to determine which products to add to the pricing calculator estimate. The only resource type that could not be found was App Service Plan. When the “Search products” search box cannot find a resource type, and we are unable to guess at the closest equivalent, then it is assumed that the resource is not billable (so it must be free).
App Services Estimate
Both rob-das-api and rob-das-win are free tier app services. So the pricing calculator shows them both as CA$0.00 per month.
Azure Cosmos DB Account Estimate
The Azure Cosmos DB account free tier option was enabled on creation of the Azure Cosmos DB account. Only one such free tier account is permitted for each Azure subscription. Only one Azure Cosmos DB account is needed for the AzureDev project because multiple databases can be created in each Azure Cosmos DB account.
https://learn.microsoft.com/en-us/azure/cosmos-db/free-tier
B2C Tenant Estimate
For Azure Active Directory, the pricing calculator “Search products” box doesn’t understand B2C, but it does make two other hits:
- Azure Active Directory (Azure AD) – synchronize on-prem directories and enable single sign-on
- Azure Active Directory External Identities – consumer identity and access management in the cloud
Option 1 is very expensive, but option 2 follows the same pattern as B2C tenant billing, a pattern based on monthly active users (MAU). Since we are managing all identities in the Azure Active Directory cloud for the AzureDev project, and we don’t need to synchronize with our on-prem directory, we go with option 2. The B2C tenant billing is based on monthly active users (MAU). The first 50,000 MAUs per month and zero SMS phone events are free. To determine the total number of MAUs, [Microsoft] combine MAUs from all tenants (both Azure AD and Azure AD B2C) that are linked to the same subscription.
https://learn.microsoft.com/en-us/azure/active-directory-b2c/billing
Function App Estimate
Although the pricing calculator “Search products” box doesn’t recognize “Function App”, it does recognize “Azure Functions”, so we add one of these for the resource named “rob-das-function-app”. The pricing tier is “Consumption”. This can be found in the function app’s app service plan, ASP-robdasrg-8976, by navigating in the portal to Home > ASP-robdasrg-8976 > Settings > Properties > Pricing tier. The Consumption plan is billed based on per-second resource consumption and executions. Consumption plan pricing includes a monthly free grant of 1 million requests and 400,000 GB-s of resource consumption per month per subscription in pay-as-you-go pricing across all function apps in that subscription.
https://azure.microsoft.com/en-us/pricing/details/functions/
However upon creation the function app could not be linked to the free tier app service plan, rob-das-win-plan, because a storage account is needed for Azure Functions. So in other words, even though the function app’s service plan includes limited free use, the storage account will incur costs. The storage account costs are estimated separately. To determine which storage account is used for the functions, navigate to the Azure Portal > Function app > Settings > Configuration > Application Settings > AzureWebJobsStorage , currently points to the ridstorage account.
Key Vault Estimate
The Azure key vault, AzureDevKV, is on the standard pricing tier, and so far we have only used standard operations on secrets. This amounts to approx. CA$0.04 per 10,000 operations.
Log Analytics Workspace Estimate
For log analytics workspace, the pricing calculator doesn’t recognize “log analytics workspace”, but when entering just “log analytics”, the pricing calculator returned one hit, Azure Monitor. So this was added to the estimate. However the monthly amount is estimated at zero because the smallest increment is in GB/day X 30 days, which adds up very quickly. Since logging must be manually turned on and only remains on for 12 hours, and since it is extremely rare that we need to turn on logging (so far remote debugging has effectively removed the need for logging), the pricing calculator value for Basic logs is left at zero, so that the monthly amount for analytics is CA$0.00.
Storage Account Estimate
The ridstorage storage account was created for the function app. The function app creation process automatically created the storage account with default values: blob public access enabled; standard performance; general purpose v1 account kind. The pricing calculator defaults to a capacity setting of 1000 GB (1TB) for a monthly cost of CA$35.69. However since the storage account is only used for the function apps, which so far, are written very concisely, there is no need for such a high capacity setting. The 1000 GB capacity setting was changed to 1 GB thus dropping the monthly estimate for the storage account to CA$0.05
APIM Estimate
The “consumption” pricing tier was chosen, which offers the first 1 million calls free per month per Azure subscription. It is not considered likely that more than 1 million calls will be made per month, so an upper bound of 1 million calls was added to the pricing calculator resulting in an estimate of CA$0.00
Summary of Estimates
The following estimate was exported from the pricing calculator on 2022-Nov-13 at a currency exchange rate of 1 USD = 1.35 CAD
https://azure.microsoft.com/en-us/pricing/calculator/
| Name | Service type | Region | Description | Monthly Cost |
|---|---|---|---|---|
| rob-das-api | App Service | Canada Central | Free Tier; 1 F1 (0 Core(s), 1 GB RAM, 1 GB Storage) x 730 Hours; Windows OS | $0.00 |
| rob-das-win | App Service | Canada Central | Free Tier; 1 F1 (0 Core(s), 1 GB RAM, 1 GB Storage) x 730 Hours; Windows OS | $0.00 |
| free-tier-cosmos-db-account | Azure Cosmos DB | East US | Standard provisioned throughput (manual), Always-free quantity enabled, Single Region Write (Single-Master) - Canada Central (Write Region); 400 RU/s x 730 Hours; 0 GB transactional storage, 2 copies of periodic backup storage; Dedicated Gateway not enabled | $0.00 |
| robdasb2c.onmicrosoft.com | Azure Active Directory External Identities | West US | Premium P1 tier: 50,000 monthly active user(s), 0 SMS/Phone Events | $0.00 |
| rob-das-function-app | Azure Functions | West US | Consumption tier, Pay as you go, 128 MB memory, 100 milliseconds execution time, 0 executions/mo | $0.00 |
| AzureDevKV | Key Vault | Canada Central | Vault: 10,000 operations, 0 advanced operations, 0 renewals, 0 protected keys, 0 advanced protected keys; Managed HSM Pools: 0 Standard B1 HSM Pool(s) x 730 Hours | $0.04 |
| DefaultWorkspace-… | Azure Monitor | Canada Central | Log analytics: Log Data Ingestion: 0 GB Daily Analytics logs ingested, 0 GB Daily Basic logs ingested, 1 months of Interactive Data Retention, 0 months of data archived, 0 Basic Log Search Queries per day with 0 GB data scanned per query, 0 Search job Queries per day with 0 GB data scanned per query; Application Insights: 3 months Data retention, 0 Multi-step Web Tests; 0 resources monitored X 1 metric time-series monitored per resource, 0 Log Alerts at 5 Minutes Frequency, 0 Additional events (in thousands), 0 Additional emails (in 100 thousands), 0 Additional push notifications (in 100 thousands), 0 Additional web hooks (in millions) | $0.00 |
| ridstorage | Storage Accounts | Canada Central | Block Blob Storage, General Purpose V1, LRS Redundancy, 1 GB Capacity - Pay as you go, 10 x 10,000 Write operations, 10 x 10,000 List and Create Container Operations, 10 x 10,000 Read operations, 1 x 10,000 Other operations. | $0.05 |
| azuredevapim | API Management | Central Canada | Consumption tier, 1000000 executions/mo | $0.00 |
| Support | $0.00 | |||
| Total | $0.09 |
Budget
The monthly estimate is only $0.09 so we are virtually on track with the stated project goal of a ZERO DOLLAR budget. To allow room for growth and the addition of new features, the AzureDev monthly budget was set to $25.00
A budget was added to the AzureDev default directory under cost management and billing.
From the Azure Portal, navigate to Home > Cost Management + Billing > Budgets > +Add
The Budget Name is AzureDevBudget; the amount is $25.00 USD; The period resets monthly; creation date is 2022-Nov-01; Expiration date is 2024-Oct-31
Alert conditions:
- Forecasted, 90% of budget, amount $23
- Actual, 90% of budget, amount $23
The alert recipient is the email address of AzureDev global administrator.
There might be a step missing here…
Even though the alert conditions and the alert email recipient address have all been defined, is there perhaps an “action” needed to connect the occurence of an alert condition with the sending of an alert email??? If so, where in the Azure Portal would such an action be defined?
19. Test Plans
This section documents all unit tests for functionality added to AzureDev so far. They follow a “preconditions”, “steps”, “expected” testing pattern, similar to arrange-act-assert.
Preparation
Set up test objects in “DTEK” tenant. ProductAdministrators and ProductViewers are appRoles.
Set up three users: Admin (has both ProductAdministrator and ProductViewer roles),
Tester (ProductViewer role only), Newguy (no roles).
Test 1. Smoke Test
Preconditions:
Not signed in.
Steps:
Browse to https://localhost:44335/
Expected:
Navigates to landing page but cannot see navigation links to simple or compound data.
Test 2. Not signed in
Preconditions:
Not signed in.
Steps:
Browse to https://localhost:44335/
Expected:
Cannot see Simple Data or Compound Data navigation menu items.
Test 3. Signed in but has no roles
Preconditions:
Sign in with user who is not assigned to any role (Newguy)
Steps:
Browse to https://localhost:44335/
Expected:
- Can see Simple Data menu item, but not Compound Data menu item.
- Can navigate to, and view, simple data.
Test 4. Signed in with ProductViewers role only
Preconditions:
Sign in with user who is only assigned to ProductViewers role (Tester)
Steps:
Browse to https://localhost:44335/
Expected:
- Can see Simple Data menu item and Compound Data menu item.
- Can navigate to, and view, simple data.
- Can see compound data navigation menu item.
- Can navigate to view Compound Data but cannot access Create New link (access denied).
- Cannot circumvent navigation to the Create New view by typing in the address
bar https://localhost:44335/CompoundData/Create (access denied)
Test 5. Signed in with both roles
Preconditions:
Sign in with user who is assigned both ProductViewers and ProductAdministrators
roles (Admin)
Steps:
Browse to https://localhost:44335/
Expected:
- Can see simple and compound data nav menu items.
- Can navigate to Compound Data view.
- Can see Create New link.
- Can navigate to, and use, Create New view.
Test 6. Can get data from secured API
Preconditions:
Sign in with any user
Steps:
- Browse to https://localhost:44335/
- Click Simple Data link in navigation menu.
Expected:
Data is fetched from API and displayed on view
Test 7. Can post data to secured API
Preconditions:
Sign in with any user
Steps:
- Browse to https://localhost:44335/
- Click Simple Data link in navigation menu.
- Click Create New link
- Enter test data and click the Create button
Expected:
- It returns to the Index view.
- All data is shown including the test data that was created.
Test 8. Can write to Debug Log from Localhost
Preconditions:
- Code has been configured as described in the APPLICATION LOGGING section.
- A debug logger has been added in Program.cs.
- There is at least one logger.LogError() call made from the default action on the MvcApp home controller.
Steps:
- Browse to https://localhost:44335/
Expected:
- The logger.LorError() call is triggered.
- The error message appears in the Visual Studio debug output window.
Test 9. Can write to MvcApp application log from Azure
Preconditions:
- Code has been configured as described in the APPLICATION LOGGING section.
- An Azure web app diagnostics logger has been added in Program.cs
- There is at least one logger.LogError() call made from the default action on the MvcApp home controller.
Steps:
- Enable application logging from the portal.
- Browse to https://rob-das-win.azurewebsites.net
- Download the zipped MvcApp log files from Azure.
- Open the diagnostics log file from the downloaded zip files, in the Logfiles\Application folder.
Expected:
- A log entry is found that corresponds to the date and time that the browse step occurred.
Test 10. Has full CRUD access to Cosmos DB Development Server
Preconditions:
- Cosmos DB Emulator is installed on a network server identified as 192.168.XXX.YYY, where XXX and YYY are replaced by the actual corresponding IP address numbers of the server
- Cosmos DB Emulator is in the running state
- The security certificate from the Cosmos DB Emulator server, identified by the friendly name DocumentDbEmulatorCertificate, has been exported to the development computer and imported as a trusted root certification authority.
- The Testing/CosmosDbConApp console application has been published to the internal network shared folder as T:\Temp\CosmosDbConApp.exe
Steps:
- From the development computer, open the Powershell command line as administrator.
- From the Cosmos DB Emulator server computer, open the emulator’s user interface by pointing a browser at https://localhost:8081/_explorer/index.html
- From the development computer Powershell command line, issue the command
T:\Temp\CosmosDbConApp.exe /endpoint https://192.168.XXX.YYY
where XXX and YYY are replaced by the actual corresponding IP address numbers of the server.
- Press any key in response to each of the console application’s prompts
- As each of the console application’s programmed steps are completed, examine the changes on the server using the emulator’s user interface.
- The console application’s programmed steps are
- create database
- create container
- add items to container
- query items
- replace item
- delete item
- delete database
Expected:
- All of the console application’s programmed steps from database creation, container creation, sample CRUD operations, through to deletion of the database, are completed successfully without throwing any exceptions.
- As each of the console application’s programmed steps are completed, their intended actions can be verified on the Cosmos DB Emulator server using the browser based user interface.
Test 11. Has full CRUD access to Cosmos DB In Azure
Preconditions:
- An Azure Cosmos DB account has been created in Azure
- The Azure Cosmos DB account is shown on the Azure Portal as Status: Online.
- The Azure Cosmos DB account URI has been obtained from the Azure Portal at Azure Cosmos DB Account>Settings>Keys>URI and is referred to here as <URI>
- The Azure Cosmos DB account primary key has been obtained from the Azure Portal at Azure Cosmos DB Account>Settings>Keys>PRIMARY KEY and is referred to here as <KEY>
- The Testing/CosmosDbConApp console application has been published to the internal network shared folder as T:\Temp\CosmosDbConApp.exe
Steps:
- From the development computer, open the Powershell command line as administrator.
- From the Azure Portal, open the Data Explorer tool from Azure Cosmos DB account>Data Explorer
- From the development computer Powershell command line, issue the command
T:\Temp\CosmosDbConApp.exe /endpoint <URI> /key <KEY>
- Press any key in response to each of the console application’s prompts
- As each of the console application’s programmed steps are completed, examine the changes using the Azure Portal’s Data Explorer tool.
- The console application’s programmed steps are
- create database
- create container
- add items to container
- query items
- replace item
- delete item
- delete database
Expected:
- All of the console application’s programmed steps from database creation, container creation, sample CRUD operations, through to deletion of the database, are completed successfully without throwing any exceptions.
- As each of the console application’s programmed steps are completed, their intended actions can be verified online in Azure using the Data Explorer Tool from the Azure Portal.
Test 12. API app read all simple data
Preconditions:
- One or more simple data items exists in the database with known values for id and name.
Steps:
- Browse to https://localhost:44335/
- Sign In using the admin account.
- Click Dev Tools > Online Tests in the navigation menu.
- Under API App Tests > Read All, click the Do Test button
Expected:
- the Test Done view appears and it has retrieved all simple data items from the database.
Test 13. API app read simple data item
Preconditions:
- A simple data item exists in the database with known values for id and name.
Steps:
- Browse to https://localhost:44335/
- Sign In using the admin account.
- Click Dev Tools > Online Tests in the navigation menu.
- Under API App Tests > Read Item, enter the known value of the id for the simple data item that exists in the database.
- Click the Do Test button
Expected:
- the Test Done view appears and it has retrieved the correct simple data id and name from the database.
Test 14. API app create simple data
Preconditions:
- none
Steps:
- Browse to https://localhost:44335/
- Sign In using the admin account.
- Click Dev Tools > Online Tests in the navigation menu.
- Under API App Tests > Create via API, enter a name for the simple data item that does not already exists in the database.
- Click the Do Test button
Expected:
- the Test Done view appears and a new item with the name that was entered now exists in the database.
Test 15. API app update simple data
Preconditions:
- A simple data item exists in the database with known values for id and name.
Steps:
- Browse to https://localhost:44335/
- Sign In using the admin account.
- Click Dev Tools > Online Tests in the navigation menu.
- Under API App Tests > Update via API, enter the id for the data item that exists and in the input box enter a different value for the name.
- Click the Do Test button
Expected:
- the Test Done view appears and an existing item in the database with the known id value, now has the new value entered in the input box for the name.
Test 16. API app delete simple data
Preconditions:
- A simple data item exists in the database with known values for id and name.
Steps:
- Browse to https://localhost:44335/
- Sign In using the admin account.
- Click Dev Tools > Online Tests in the navigation menu.
- Under API App Tests > Delete Item via API, enter the known value of the id for the simple data item that exists in the database.
- Click the Do Test button
Expected:
- the Test Done view appears and the simple data item no longer exists in the database.
20. Publishing the AzureDev Apps
This section provides step-by-step instructions for publishing the applications (CosmosDbConApp, MvcApp, WebApi, FunctionApp) from Visual Studio 2022 to their various hosting environments.
20.1 Publishing CosmosDbConApp
CosmosDbConApp is a test program written as a console application and can be run locally, so there is no need to publish it to Azure. Here are the steps to publish the executable to network folder identified as T:\Temp
It is assumed that the database security has been set up as described in the Security section of this document.
Steps
Right-click the CosmosDbConApp project and choose Publish.

Choose Folder > Next > Folder > Next
Using the Browse button, set the target folder location, for example T:\Temp

Click Finish and then Close. This will create the Publish Profile. Before publishing however, there are a few more profile settings to set. Click More actions > Edit

Set them as follows:
- Configuration: Debug | Any CPU
- Deployment mode: Self-contained
- Target runtime: win-x64
- Produce single file: checked

Then press Save.
Finally, after the publish profile is created, click the Publish button to actually publish CosmosDbConApp to the target location.

This will initiate the publish process in Visual Studio, after which you can verify that CosmosDbConApp.exe and supporting files have been published to T:\Temp
At this point, it would be a good idea to do the relevant Cosmos DB unit tests, which can be found in the Test Plans section of this document.
20.2 Publishing MvcApp
Here are step-by-step instructions for publishing MvcApp from Visual Studio 2022 on localhost, to the Azure App Service named rob-das-win under the subscription named Azure subscription 1. The main thing to do is to create the publish profile. Once the publish profile has been created and setup properly, it’s a single click to actually publish the app to Azure.
From Visual Studio 2022 open the AzureDev solution, right-click the MvcApp project and choose Publish. The first time you do this, it will launch the wizard that creates the publish profile.

Choose Azure and click Next.

Choose Azure App Service (Windows) and click Next.

For Subscription name select Azure subscription 1. For App Service instances, expand rob-das-rg and choose rob-das-win. Click Next.

For Deployment type select Publish and then click Finish. Then click Close to close the wizard. The publish profile has now been created, however more actions are required. Expand the More actions dropdown list and choose Edit.

Under the Publish Settings expand File Publish Options and tick the box labelled Remove additional files at destination. (Optionally, you can change the Configuration from Release to Debug if you wish to remotely debug – see the section on Debugging.)
Click Save.

The publish profile is complete. In order to actually publish to Azure, click the Publish button.

20.3 Publishing WebApi
Here are step-by-step instructions for publishing WebApi from Visual Studio 2022 on localhost, to the Azure App Service named rob-das-api under the subscription named Azure subscription 1. The main thing to do is to create the publish profile. Once the publish profile has been created and setup properly, it’s a single click to actually publish the api to Azure.
From Visual Studio 2022 open the AzureDev solution, right-click the WebApi project and choose Publish. The first time you do this, it will launch the wizard that creates the publish profile.
Choose Azure and click Next.
Choose Azure App Service (Windows) and click Next.

For Subscription name select Azure subscription 1. For App Service instances, expand rob-das-rg and choose rob-das-api. Click Next.

Leave API Management APIs blank and tick the Skip this step box. Click Next.
For Deployment type select Publish and then click Finish. Then click Close to close the wizard. The publish profile has now been created, however more actions are required. Expand the More actions dropdown list and choose Edit.
Under the Publish Settings expand File Publish Options and tick the box labelled Remove additional files at destination. (Optionally, you can change the Configuration from Release to Debug if you wish to remotely debug – see the section on Debugging.)
Click Save.
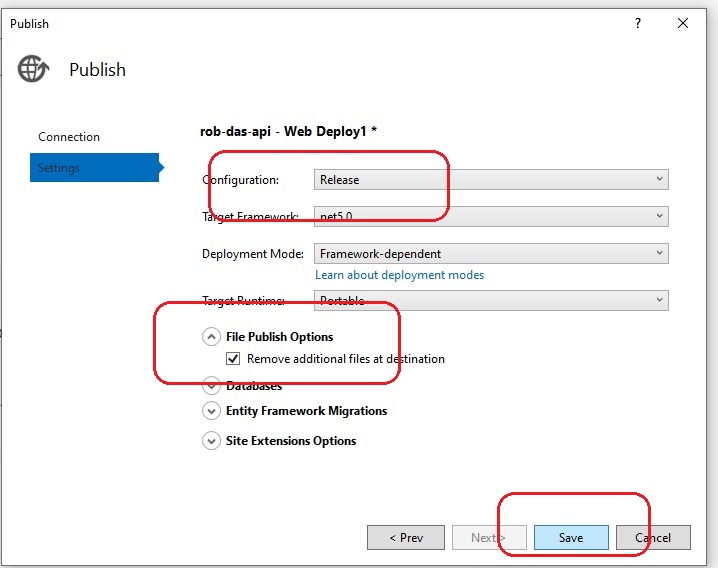
The publish profile is complete. In order to actually publish to Azure, click the Publish button.
20.4 Publishing FunctionApp
Here are step-by-step instructions for publishing FunctionApp from Visual Studio 2022 on localhost, to the Azure Function App named rob-das-function-app under the subscription named Azure subscription 1. The main thing to do is to create the publish profile. Once the publish profile has been created and setup properly, it’s a single click to actually publish the function app to Azure.
From Visual Studio 2022 open the AzureDev solution, right-click the FunctionApp project and choose Publish. The first time you do this, it will launch the wizard that creates the publish profile.
21. How to Start AzureDevApp Locally
dotnet build azuredevapp.sln --framework net6.0

dotnet restore
cd functionapp
dotnet build --framework net6.0 --configuration release
.\CosmosDbConApp.exe /endpoint=https://w16-cosmosdb:8081
T:\Temp\SeedDatabase\SeedDatabase.exe /endpoint=https://w16-cosmosdb:8081

cd conapps
cd cosmosdbconapp
dotnet build CosmosDbConApp.csproj --framework net6.0

cd testing
cd functionapptests
dotnet test

cd c:\repo\azuredevapp
dotnet clean
dotnet restore
dotnet build --framework net6.0

cd functionApp
func start --port 7228

cd webapi
dotnet build --framework net6.0
dotnet run --urls=https://localhost:44301

cd mvcapp
dotnet build --framework net6.0
dotnet run --urls=https://localhost:44335/ --framework net6.0

dotnet build AzureDevApp.sln --framework net6.0
dotnet run --urls=https://localhost:44335/ --project .\MvcApp\MvcApp.csproj
21.1 Publishing CosmosDbConApp Standalone Executable
cd conapps
cd cosmosdbconapp
dotnet build CosmosDbConApp.csproj --framework net8.0 --configuration release
dotnet publish -r win-x64
A publish folder will be created in bin\Release\net8.0\win-x64\publish
containing the only files that need to be deployed to the network folder.
For .NET 8 the folder contains the following files:
- Cosmos.CRTCompat.dll
- CosmosDbConApp.exe
- CosmosDbConApp.pdb
- Microsoft.Azure.Cosmos.ServiceInterop.dll
21.2 Publishing SeedDatabase Standalone Executable
cd conapps
cd seeddatabase
dotnet build seeddatabase.csproj --framework net8.0 --configuration release
dotnet publish -r win-x64
Assuming the contents of the publish folder is deployed to
S:\Code\AzureDev\SeedDatabase then the command to run the application is
S:\Code\AzureDev\SeedDatabase\SeedDatabase.exe /endpoint "https://w16-cosmosdb:8081"
22. Debugging the function app with VSCode
Add the following entry to .vscode\launch.json configurations array:
        {
            "name": ".NET Core Attach (choose process)",
            "type": "coreclr",
            "request": "attach",
            "processId": "${command:pickProcess}"
        }
Change directory to FunctionApp and start the function app on the correct port set up for debugging:
func start --dotnet-isolated-debug --port 7228
- When the function app is running, press F5 to start debugging.
- Go to the Run and Debug tab in VS Code.
- Next to the green “start debugging” button is a dropdown list of configurations. Select the one you just added identified by “.NET Core Attach (choose process)”.
- Press F5 to start debugging.
- VS Code will prompt you to pick a process to attach to. Select the correct process with the “func start …” command.
- Wait until the debugger is ready (a few minutes).
- Set a breakpoint in a function and invoke the function (for example, put http://localhost:7228/api/Function1 into a browser)
- VS Code should now stop at the breakpoint you set.
GLOSSARY OF TERMS
The following definitions are from the Microsoft Online Azure Documentation site.
Application object An Azure AD application is defined by its one and only application object, which resides in the Azure AD tenant where the application was registered (known as the application’s “home” tenant). The application object is the global representation of an application for use across all tenants. An application object is used as a template or blueprint to create one or more service principal objects.
Azure Function parameter binding is a way of declaratively connecting another resource to the function; bindings may be connected as input bindings, output bindings, or both. Data from bindings is provided to the function as parameters.
Azure Function triggers cause a function to run. A trigger defines how a function is invoked and a function must have exactly one trigger. Triggers have associated data, which is often provided as the payload of the function.
managed identities provide an automatically managed identity in Azure Active Directory for applications to use when connecting to resources that support Azure Active Directory (Azure AD) authentication. Applications can use managed identities to obtain Azure AD tokens without having to manage any credentials.
Microsoft Identity aka Microsoft Identity Platform is a trustworthy identity platform that protects all kinds of online identities including web apps, APIs, and user identities.
MSAL.NET is an SDK, available as a NuGet package, that enables web applications to use Microsoft Identity.
OAuth 2.0 authorization code flow exchanges an Authorization Code for a token. The app must be server-side because during this exchange, it must also pass along the application’s Client Secret, which must always be kept secure (you will have to store it in the client).
OAuth 2.0 client credentials flow is when the system authenticates and authorizes the app rather than a user. It is used for machine-to-machine (M2M) applications, such as CLIs, daemons, or services running on your back-end.
OAuth 2.0 on-behalf-of flow is when an application invokes a service/web API and it needs to secure an access token from the Microsoft identity platform, on behalf of the user.
OAuth 2.0 user consent flow is when an application directs users to the authorization endpoint with the intent to record consent for only the current user.
security principal can be a signed-on user, a group, a service principal (headless process), or a managed identity.
service principal To access resources that are secured by an Azure AD tenant, the application that requires access must be represented by a service principal. The service principal is the local representation of an application for use in a specific tenant.
REFERENCES
1. Web App that signs in users
https://github.com/Azure-Samples/active-directory-aspnetcore-webapp-openidconnect-v2/tree/master/1-WebApp-OIDC/1-1-MyOrg
https://docs.microsoft.com/en-us/azure/active-directory/develop/scenario-web-app-sign-user-app-configuration?tabs=aspnetcore
2. MVC App created based on
https://docs.microsoft.com/en-us/learn/paths/m365-identity-associate/
3. Web API based on
https://docs.microsoft.com/en-us/learn/modules/identity-secure-custom-api/
https://docs.microsoft.com/en-us/aspnet/core/tutorials/first-web-api
4. Roles:
https://docs.microsoft.com/en-us/learn/modules/identity-users-groups-approles/6-application-roles
https://docs.microsoft.com/en-us/learn/modules/identity-users-groups-approles/7-exercise-authorize-app-roles
5. Assign users to app roles
6. Markdown syntax used in this README.md file
https://www.markdownguide.org/basic-syntax/#code
https://docs.microsoft.com/en-us/contribute/markdown-reference
7. Security models
https://github.com/Azure-Samples/active-directory-aspnetcore-webapp-openidconnect-v2
https://docs.microsoft.com/en-us/learn/modules/identity-secure-custom-api/7-exercise-call-secured-apis-daemon-apps
https://docs.microsoft.com/en-us/aspnet/core/security/app-secrets
https://docs.microsoft.com/en-us/azure/active-directory/develop/app-objects-and-service-principals
https://learn.microsoft.com/en-us/azure/active-directory/develop/app-objects-and-service-principals
https://docs.microsoft.com/en-us/azure/active-directory/develop/active-directory-v2-protocols
https://docs.microsoft.com/en-us/azure/active-directory/managed-identities-azure-resources/overview
https://youtu.be/_6ojkepmZBA
https://www.youtube.com/watch?v=QrIwOMNzPjk&list=PLUZTRmXEpBy0b3FdyE_xmvErayITTeJvP
8. Remotely attaching a debugger to a web app running in an Azure App Service
9. Application Logging
https://docs.microsoft.com/en-us/learn/modules/capture-application-logs-app-service/2-enable-and-configure-app-service-application-logging
https://docs.microsoft.com/en-us/azure/app-service/troubleshoot-diagnostic-logs#access-log-files
https://docs.microsoft.com/en-us/windows/desktop/Http/w3c-logging
https://www.iis.net/downloads/community/2010/04/log-parser-22
https://docs.microsoft.com/en-us/aspnet/core/fundamentals/logging/?view=aspnetcore-5.0#logging-in-azure
10. Database
https://docs.microsoft.com/en-us/azure/cosmos-db/sql/sql-api-get-started
https://docs.microsoft.com/en-us/azure/cosmos-db/free-tier
https://github.com/Microsoft/azure-docs/blob/master/articles/cosmos-db/local-emulator.md
https://docs.microsoft.com/en-us/azure/cosmos-db/local-emulator
https://learn.microsoft.com/en-us/azure/cosmos-db/emulator-command-line-parameters
https://docs.microsoft.com/en-us/azure/cosmos-db/local-emulator-export-ssl-certificates
https://stackoverflow.com/questions/46641624/azure-cosmos-db-emulator-on-local-network-throwing-security-error
https://www.youtube.com/watch?v=XU1ZuwiWW_k
https://docs.microsoft.com/en-us/learn/paths/work-with-nosql-data-in-azure-cosmos-db/
https://docs.microsoft.com/en-us/azure/cosmos-db/free-tier#free-tier-with-shared-throughput-database
https://docs.microsoft.com/en-us/azure/cosmos-db/choose-api
https://docs.microsoft.com/en-us/dotnet/api/microsoft.azure.cosmos.cosmosclient?view=azure-dotnet
https://docs.microsoft.com/en-us/azure/cosmos-db/introduction#next-steps
https://learn.microsoft.com/en-us/ef/core/what-is-new/ef-core-6.0/whatsnew#cosmos-provider-enhancements
https://learn.microsoft.com/en-us/ef/core/providers/cosmos/limitations
https://www.youtube.com/watch?v=zQC9D00pr6I&t=404s
https://www.youtube.com/watch?v=j5ylkjbJmu4
https://github.com/CuriousDrive/EFCore.AllDatabasesConsidered
https://docs.microsoft.com/en-us/azure/cosmos-db/local-emulator?tabs=ssl-netstd21#enable-access-to-emulator-on-a-local-network
https://docs.microsoft.com/en-us/azure/cosmos-db/local-emulator?tabs=ssl-netstd21
https://learn.microsoft.com/en-us/azure/cosmos-db/troubleshoot-local-emulator
11. Documentation Tools
12. Key Vault
https://learn.microsoft.com/en-us/azure/key-vault/general/assign-access-policy
https://learn.microsoft.com/en-us/azure/app-service/app-service-key-vault-references
https://learn.microsoft.com/en-us/azure/app-service/app-service-key-vault-references?tabs=azure-cli#reference-syntax
https://learn.microsoft.com/en-us/azure/key-vault/general/security-features
https://learn.microsoft.com/en-us/azure/key-vault/secrets/secrets-best-practices
https://learn.microsoft.com/en-us/azure/key-vault/general/tutorial-net-create-vault-azure-web-app
https://learn.microsoft.com/en-us/azure/key-vault/general/developers-guide
https://learn.microsoft.com/en-us/azure/key-vault/general/security-features
13. Microsoft Online Azure Documentation site
https://learn.microsoft.com/en-us/azure/
14. Azure Functions
https://docs.microsoft.com/en-us/azure/azure-functions/functions-bindings-cosmosdb-v2
https://docs.microsoft.com/en-us/azure/azure-functions/functions-bindings-cosmosdb-v2-input
https://docs.microsoft.com/en-us/azure/azure-functions/functions-bindings-cosmosdb-v2-output
https://docs.microsoft.com/en-us/azure/azure-functions/functions-bindings-cosmosdb-v2-trigger
https://learn.microsoft.com/en-us/azure/azure-functions/functions-bindings-cosmosdb?tabs=csharp
https://learn.microsoft.com/en-us/azure/azure-functions/functions-bindings-expressions-patterns
https://learn.microsoft.com/en-us/azure/azure-functions/functions-bindings-http-webhook
https://docs.microsoft.com/en-us/learn/modules/chain-azure-functions-data-using-bindings/8-summary#additional-resources
https://docs.microsoft.com/en-us/azure/azure-functions/functions-bindings-http-webhook-trigger?tabs=in-process%2Cfunctionsv2&pivots=programming-language-csharp
https://learn.microsoft.com/en-us/training/paths/create-serverless-applications/
https://docs.microsoft.com/en-us/azure/azure-functions/functions-how-to-use-azure-function-app-settings?tabs=portal
https://azure.microsoft.com/en-ca/pricing/details/functions/
https://docs.microsoft.com/en-us/learn/modules/develop-test-deploy-azure-functions-with-visual-studio/7-summary#learn-more
https://www.youtube.com/watch?v=kdRVComKwOc&t=187s
https://learn.microsoft.com/en-us/azure/azure-functions/security-concepts?tabs=v4
https://learn.microsoft.com/en-us/azure/azure-functions/functions-develop-vs-code
https://docs.microsoft.com/en-us/azure/azure-functions/create-first-function-vs-code-csharp?tabs=in-process
https://www.youtube.com/watch?v=iprndNsUeeg
https://learn.microsoft.com/en-us/azure/azure-functions/functions-create-your-first-function-visual-studio?tabs=in-process
https://learn.microsoft.com/en-us/training/modules/develop-test-deploy-azure-functions-with-visual-studio/
https://docs.microsoft.com/en-us/answers/questions/475517/azure-functions-update-amp-delete-http-trigger-in.html
https://www.youtube.com/watch?v=y5Lqp56y47o
https://docs.microsoft.com/en-us/azure/azure-functions/functions-how-to-use-azure-function-app-settings?tabs=portal
LEGAL NOTICES
-
THE AZUREDEV SOFTWARE AND ASSOCIATED DOCUMENTATION FILES ARE PROVIDED “AS IS”, WITHOUT WARRANTY OF ANY KIND, EXPRESS OR IMPLIED, INCLUDING BUT NOT LIMITED TO THE WARRANTIES OF MERCHANTABILITY, FITNESS FOR A PARTICULAR PURPOSE AND NONINFRINGEMENT. IN NO EVENT SHALL THE AUTHORS OR COPYRIGHT HOLDERS BE LIABLE FOR ANY CLAIM, DAMAGES OR OTHER LIABILITY, WHETHER IN AN ACTION OF CONTRACT, TORT OR OTHERWISE, ARISING FROM, OUT OF OR IN CONNECTION WITH THE SOFTWARE OR THE USE OR OTHER DEALINGS IN THE SOFTWARE.
-
THE AZUREDEV SOFTWARE AND ASSOCIATED DOCUMENTATION FILES MAY NOT BE USED IN WHOLE OR IN PART WITHOUT THE EXPRESS WRITTEN CONSENT OF THE AUTHOR, ROBI INDRA DAS.
SUPPLIMENTARY MATERIAL
APPENDIX 1 — Create and Secure a web API with Microsoft Identity
This appendix provides a step-by-step guide to create an Azure hosted .NET Core web API application and secure it with Microsoft identity. It uses:
- the Azure Portal
- .NET 5
- dotnet CLI
- Visual Studio Code
It is based on the following Microsoft learning path lab exercise, which has been adapted to be used with the OAuth 2.0 client credential flow, but not the on-behalf-of flow.
A1.1 — Create API Azure AD application
Open a browser and navigate to the Azure Active Directory admin center. Sign in using a Work or School Account that has global administrator rights to the tenant.
- Select Azure Active Directory in the left-hand navigation.
- Select App registrations in the left-hand navigation.
- On the App registrations page, select New registration.

On the Register an application page, set the values as follows:
- Name: My API
- Supported account types: Accounts in this organizational directory only (Single tenant)
Select Register to create the application.
On the My API page, copy the values of Application (client) ID and Directory (tenant) ID.

A1.2 — Expose API and Create the Application ID URI
Select Expose an API in the left-hand navigation. Select Add a scope.

Accept the proposed application ID URI, api://{clientId}, by selecting Save and Continue.
You can confirm that the Application URI ID has now been created by navigating to the App Registration for the API and checking the Application ID URI property:

A1.3 — Create a .NET Core web API application
This example will use an Azure AD application to authenticate calls made to the application using a token provided in the Authentication header of the Http request.
Open your command prompt, navigate to a directory where you want to save your work. Execute the following command to create a new .NET Core web API application:
dotnet new webapi -o MyApi -au singleorg
After creating the application, run the following commands:
cd MyApi
dotnet add package Microsoft.Identity.Web
Open the scaffolded project folder, which is named MyApi, in Visual Studio Code. When a dialog box asks if you want to add required assets to the project, select Yes.
The scaffolded project contains a controller for weather forecasts that isn’t needed. Delete the following files:
- WeatherForecast.cs
- Controllers\WeatherForecastController.cs
The web API application will run concurrently with other web applications. Each application must bind to a different TCP port. Update this web API application to use a specific port:
- Locate and open he ./.vscode/launch.json file.
- Locate the configuration named .NET Core Launch (web). Update the env attribute of that configuration to include the ASPNETCORE_URLS property:
"env": {
  "ASPNETCORE_URLS":"https://localhost:5050"
}
The web API application doesn’t contain any HTML pages, so there’s no need to launch the browser. In the launch.json file, locate and comment out the entire serverReadyAction node.
// "serverReadyAction": {
//   "action": "openExternally",
//   "pattern": "^\\s*Now listening on:\\s+(https?://\\S+)"
// },
A1.4 — Configure the web application with the Azure AD application
Locate and open the ./appsettings.json file in the ASP.NET Core project.
- Set the AzureAd.Domain property to the domain of your Azure AD tenant where you created the Azure AD application (for example: contoso.onmicrosoft.com).
- Set the AzureAd.TenantId property to the Directory (tenant) ID you copied when creating the Azure AD application in the previous section.
- Set the AzureAd.ClientId property to the Application (client) ID you copied when creating the Azure AD application in the previous section.
A1.5 — Data models and sample data
By convention, .NET Core web API projects store model classes in a folder named Models. Create a new folder named Models in the project directory. In the Models folder, create a new file named Category.cs and add the follow C# code to it:
namespace ProductCatalog.Models
{
  public class Category
  {
    public int Id { get; set; }
    public string Name { get; set; }
  }
}
In the Models folder, create a new file named Product.cs and add the following C# code to it:
namespace ProductCatalog.Models
{
  public class Product
  {
    public int Id { get; set; }
    public string Name { get; set; }
    public Category Category { get; set; }
  }
}
This exercise will store sample data in-memory while the app is running. Create a new file named SampleData.cs in the root folder of the project. Add the following C# code to the file:
using System.Collections.Generic;
using ProductCatalog.Models;

namespace ProductCatalog
{
  public class SampleData
  {
    public List<Category> Categories { get; set; }
    public List<Product> Products { get; set; }

    public static SampleData Initialize()
    {
      var data = new SampleData();

      int nextCategoryId = 0;
      data.Categories = new List<Category>();
      foreach (var name in new string[] {
               "Smelly", "Tall", "Lonely", "Sexy", "Kind", "Fishy", "Musical" })
      {
          data.Categories.Add(new() { ID = nextCategoryId++, Name = name });
      }

      int nextProductId = 0;
      data.Products = new List<Product>();
      foreach (var name in new string[] {
                "Giraffe", "Blanket", "Poem", "Lesson", "Pork Chop", "Retinue", "Hat",
                "Car", "Chair", "Tree", "Knome", "Mallet" })
      {
          data.Products.Add(new() { ID = nextProductId++, Name = name,
                                    Category = ChooseRandom(data.Categories) });
      }

      return data;
    }
    private static Random random = new Random();
    private static Category ChooseRandom(List<Category> categories)
    {
        var min = 0;
        var max = categories.Count - 1;
        var randomCategoryId = random.Next(min, max);
        Category randomCategory = categories.First(
                                    categories => categories.ID == randomCategoryId);

        return randomCategory;
    }
  }
}
The sample data will be stored as a singleton in the dependency injection container built into ASP.NET Core. Open the Startup.cs file (or Program.cs for .NET 6) in the root folder of the project. Add the following line at the bottom of the ConfigureServices() method:
services.AddSingleton(SampleData.Initialize());
A1.6 — Web API Controllers
In the Controllers folder, create a new file named CategoriesController.cs and add the following C# code. The controller has the [Authorize] attribute, which forces the request to have a valid Authorization header in the request.
using System.Collections.Generic;
using System.Linq;
using ProductCatalog.Models;
using Microsoft.AspNetCore.Authorization;
using Microsoft.AspNetCore.Mvc;
using Microsoft.Identity.Web.Resource;

namespace ProductCatalog.Controllers
{
  [Authorize]
  [ApiController]
  [Route("api/[controller]")]
  public class CategoriesController : ControllerBase
  {
    SampleData data;

    public CategoriesController(SampleData data)
    {
      this.data = data;
    }

    public List<Category> GetAllCategories()
    {
      return data.Categories;
    }

    [HttpGet("{id}")]
    public Category GetCategory(int id)
    {
      return data.Categories.FirstOrDefault(p => p.Id.Equals(id));
    }

    [HttpPost]
    public ActionResult CreateCategory([FromBody] Category newCategory)
    {
      if (string.IsNullOrEmpty(newCategory.Name))
      {
        return BadRequest("Product Name cannot be empty");
      }
      newCategory.Id = (data.Categories.Max(c => c.Id) + 1);
      data.Categories.Add(newCategory);
      return CreatedAtAction(nameof(GetCategory), new { id = newCategory.Id }, newCategory);
    }
  }
}
In the Controllers folder, create a new file named ProductsController.cs and add the follow C# code:
using System;
using System.Collections.Generic;
using System.Linq;
using Microsoft.AspNetCore.Authorization;
using Microsoft.AspNetCore.Http;
using Microsoft.AspNetCore.Mvc;
using ProductCatalog.Models;
using Microsoft.Identity.Web.Resource;

namespace ProductCatalog.Controllers
{
  [Authorize]
  [ApiController]
  [Route("api/[controller]")]
  public class ProductsController : ControllerBase
  {
    SampleData data;

    public ProductsController(SampleData data)
    {
      this.data = data;
    }

    public List<Product> GetAllProducts()
    {
      return data.Products;
    }

    [HttpGet("{id}")]
    public Product GetProduct(int id)
    {
      return data.Products.FirstOrDefault(p => p.Id.Equals(id));
    }

    [HttpPost]
    public ActionResult CreateProduct([FromBody] Product newProduct)
    {
      if (string.IsNullOrEmpty(newProduct.Name))
      {
        return BadRequest("Product Name cannot be empty");
      }

      newProduct.Category.Name = data.Categories.FirstOrDefault(
                                  c => c.Id == newProduct.Category.Id)?.Name;
      if (string.IsNullOrEmpty(newProduct.Category?.Name))
      {
        return BadRequest("Product Category cannot be empty");
      }
      newProduct.Id = (data.Products.Max(p => p.Id) + 1);
      data.Products.Add(newProduct);
      return CreatedAtAction(nameof(GetProduct), new { id = newProduct.Id }, newProduct);
    }
  }
}
We now have a web API that is secured with Microsoft identity.
APPENDIX 2 — Leverage app roles to secure custom APIs – client credentials flow
This section provides a step-by-step guide to add app roles (application permission) to an Azure AD Application registration and consume a secured API as a daemon application. It uses:
- the Azure Portal
- .NET 5
- dotnet CLI
- Visual Studio Code
It is based on the following Microsoft learning path lab exercise, which has been adapted to use the OAuth 2.0 client credential flow instead of the on-behalf-of flow.
A2.1 — Add app roles (application permission) to an Azure AD application
Select Azure Active Directory in the left-hand navigation.
Select App registrations in the left-hand navigation.
On the App registrations page, locate the application registration that represents the secured web API application from the previous section (to verify the application, compare the Application (client) ID and Directory (tenant) ID in the portal to the values set in the web api application).
Select App roles in the left-hand navigation.
Select Create app role.
On the Create app role panel, set the values as follows:
- Display name: access_as_application
- Allowed member types: Applications
- Value: access_as_application
- Description: Accesses My API as an application.
- Do you want to enable this app role?: Checked
Select Apply.

When creating an app role, consider the following requirements:
- Leave Allowed Member Types set to “Application” only.
- Make sure Display name and Value don’t contain spaces.
A2.2 — Register daemon app to call a protected web API
On the App registrations page, select New registration.
On the Register an application page, set the values as follows:
- Name: My daemon app
- Supported account types: Accounts in this organizational directory only (Single tenant)
Select Register to create the application.
On the My daemon app page, copy the values Application (client) ID and Directory (tenant) ID; you’ll need these values later.
A2.3 — Create a client secret for the daemon app
The daemon app will use the Client Credentials flow to acquire the token. The Client Credentials flow requires the web app to authenticate with its application ID and either a certificate or secret. Select Certificates & secrets from the left-hand navigation panel. Select the New client secret button:

When prompted, give the secret a description and select one of the expiration duration options provided and select Add. What you enter and select doesn’t matter for this exercise.
The Certificate & Secrets page will display the new secret. It’s important you copy this value as it’s only shown this one time; if you leave the page and come back, it will only show as a masked value.

A2.4 — Grant API permissions
The daemon app requires permission to call the web API. Select API permissions from the left-hand navigation panel. Select Add a permission. On the My APIs tab, select the app registration that represents the web API application.

Select Application permissions, select the access_as_application role, then select Add permission.

The API permissions page will redisplay. Note there are two warning messages about the application:
- Users will have to reconsent to the application even if they’ve already done so.
- The application permission is not yet consented by a tenant administrator.

Since this is a daemon application that doesn’t have a user interface, admin consent will be granted using the Azure AD admin center. Select Grant admin consent for [Tenant Name]. Select Yes to complete the consent process.
A2.5 — Create a .NET Core console application
Open your command prompt, navigate to a directory where you want to save your work. Execute the following command to create a new console application:
dotnet new console -o MyDaemonApp
cd MyDaemonApp
dotnet add package Microsoft.Identity.Client
dotnet add package Microsoft.Extensions.Configuration
dotnet add package Microsoft.Extensions.Configuration.Binder
dotnet add package Microsoft.Extensions.Configuration.Json
Open the scaffolded project folder in Visual Studio Code. When a dialog box asks if you want to add required assets to the project, select Yes.
Create a new file in the root folder of the project named AuthenticationConfig.cs. This class will contain the information necessary to acquire a token as the configured daemon application. Add the following to the file:
using Microsoft.Extensions.Configuration;
using System;
using System.Globalization;
using System.IO;

namespace MyDaemonApp
{
  public class AuthenticationConfig
  {
    public string Instance { get; set; } = "https://login.microsoftonline.com/{0}";
    public string Tenant { get; set; }
    public string ClientId { get; set; }
    public string Authority
    {
      get
      {
        return String.Format(CultureInfo.InvariantCulture, Instance, Tenant);
      }
    }
    public string ClientSecret { get; set; }
    public string ApiBaseAddress { get; set; }
    public string ApiScope { get; set; }
    public static AuthenticationConfig ReadFromJsonFile(string path)
    {
      IConfigurationRoot Configuration;

      var builder = new ConfigurationBuilder()
      .SetBasePath(Directory.GetCurrentDirectory())
      .AddJsonFile(path);

      Configuration = builder.Build();
      return Configuration.Get<AuthenticationConfig>();
    }
  }
}
Add a file to the root folder of the project named appsettings.json. Add the following to the file:
{
  "Instance": "https://login.microsoftonline.com/{0}",
  "Tenant": "[TENANT-ID-FROM-PORTAL]",
  "ClientId": "[CLIENT-ID-FROM-PORTAL]",
  "ClientSecret": "[CLIENT-SECRET-FROM-PORTAL]",
  "ApiBaseAddress": "https://localhost:5050",
  "ApiScope": "api://[web-api-client-id]/.default"
}
Set the Tenant property to the Directory (tenant) ID you copied when creating the Azure AD application. Set the ClientId property to the Application (client) ID you copied when creating the Azure AD application. Set the ClientSecret property to the client secret you created when creating the Azure AD application. Replace [web-api-client-id] in the APIScope property value with the client ID for the web API application created in the previous section.
The scope doesn’t include the delegated scopes (Category.Read, etc.) nor does it include the application role (access_as_application). Apps using the client credentials flow must use a static scope definition that has been configured in the portal. The .default suffix indicates that the pre-configured scopes/roles are used.
Open the file Program.cs. Add the following usings to the top of the file:
using Microsoft.Identity.Client;
using System.Linq;
using System.Net.Http;
using System.Threading.Tasks;
using System.Text.Json;
using System.Net.Http.Headers;
Replace the contents of the Program class with the following code:
class Program
{
  static void Main(string[] args)
  {
    try
    {
      RunAsync().GetAwaiter().GetResult();
    }
    catch (Exception ex)
    {
      Console.ForegroundColor = ConsoleColor.Red;
      Console.WriteLine(ex.Message);
      Console.ResetColor();
    }
  }

  private static async Task RunAsync()
  {
    AuthenticationConfig config = AuthenticationConfig.ReadFromJsonFile("appsettings.json");

    IConfidentialClientApplication app =
      ConfidentialClientApplicationBuilder.Create(config.ClientId)
          .WithClientSecret(config.ClientSecret)
          .WithAuthority(new Uri(config.Authority))
          .Build();

    // With client credentials flows the scopes is ALWAYS of the shape "resource/.default", as the
    // application permissions need to be set statically (in the portal or by PowerShell), and then granted by
    // a tenant administrator
    string[] scopes = new string[] { config.ApiScope };

    AuthenticationResult result = null;
    try
    {
      result = await app.AcquireTokenForClient(scopes).ExecuteAsync();
      Console.ForegroundColor = ConsoleColor.Green;
      Console.WriteLine("Token acquired \n");
      Console.ResetColor();
    }
    catch (MsalServiceException ex) when (ex.Message.Contains("AADSTS70011"))
    {
      // Invalid scope. The scope has to be of the form "https://resourceurl/.default"
      // Mitigation: change the scope to be as expected
      Console.ForegroundColor = ConsoleColor.Red;
      Console.WriteLine("Scope provided is not supported");
      Console.ResetColor();
    }

    if (result != null)
    {
      var httpClient = new HttpClient();
      var defaultRequestHeaders = httpClient.DefaultRequestHeaders;
      if (defaultRequestHeaders.Accept == null || !defaultRequestHeaders.Accept.Any(m => m.MediaType == "application/json"))
      {
        httpClient.DefaultRequestHeaders.Accept.Add(new MediaTypeWithQualityHeaderValue("application/json"));
      }
      defaultRequestHeaders.Authorization = new AuthenticationHeaderValue("bearer", result.AccessToken);

      HttpResponseMessage response = await httpClient.GetAsync($"{config.ApiBaseAddress}/api/Categories");
      if (response.IsSuccessStatusCode)
      {
        string json = await response.Content.ReadAsStringAsync();
        var results = JsonDocument.Parse(json);
        Console.ForegroundColor = ConsoleColor.Gray;
        Display(results.RootElement.EnumerateArray());
      }
      else
      {
        Console.ForegroundColor = ConsoleColor.Red;
        Console.WriteLine($"Failed to call the Web Api: {response.StatusCode}");
        string content = await response.Content.ReadAsStringAsync();

        // Note that if you got reponse.Code == 403 and reponse.content.code == "Authorization_RequestDenied"
        // this is because the tenant admin as not granted consent for the application to call the Web API
        Console.WriteLine($"Content: {content}");
      }
      Console.ResetColor();

    }
  }

  private static void Display(JsonElement.ArrayEnumerator results)
  {
    Console.WriteLine("Web Api result: \n");

    foreach (JsonElement element in results)
    {
      var id = -1;
      var name = string.Empty;

      if (element.TryGetProperty("id", out JsonElement idElement))
      {
        id = idElement.GetInt32();
      }
      if (element.TryGetProperty("name", out JsonElement nameElement))
      {
        name = nameElement.GetString();
      }
      Console.WriteLine($"ID: {id} - {name}");
    }
  }
}
A2.6 — Update web API application to authorize application roles
In a separate instance of Visual Studio Code, open the folder containing the web API application.
Open the file Controllers\CategoriesController.cs. Locate the method GetAllCategories and replace its contents with the following code:
public List<Category> GetAllCategories() {
  if (!HttpContext.User.IsInRole("access_as_application"))
  {
    throw new Exception("access_as_application role is missing");
  }
  return data.Categories;
}
On the Visual Studio Code menu bar, select Run > Run Without Debugging to start the web API. Execute the following command in a command prompt to compile and run the application:
dotnet dev-certs https --trust
dotnet build
dotnet run
The list of categories will display in the command window.
A2.7 — Troubleshooting
Runtime Error AADSTS500011
When running MyDaemonApp, You receive the error message:
AADSTS500011: The resource principal named api://55555555-5555-5555-5555-5555555555555 was not found in the tenant named Default Directory. This can happen if the application has not been installed by the administrator of the tenant or consented to by any user in the tenant. You might have sent your authentication request to the wrong tenant.
The likely reason for this error is that the step was missed to expose API and create the Application ID URI. The resource principal named in the error message is in fact the Application ID URI. You can check if the Application ID URI has been created for the API, by navigating to the Overview page for the app registration and examining the Application ID URI property. It needs to be set as follows:
APPENDIX 3 — Manage Website Authorization with RBAC and AAD
This section provides a step-by-step guide to create a website with Azure App Services, and manage Role Based Access Control using Azure Active Directory App Roles. It is loosely based on the Microsoft Learn lab exercises found here:
- https://docs.microsoft.com/en-us/learn/modules/identity-users-groups-approles/3-exercise-create-web-app
- https://docs.microsoft.com/en-us/learn/modules/identity-users-groups-approles/5-exercise-authorize-security-groups
- https://docs.microsoft.com/en-us/learn/modules/identity-users-groups-approles/7-exercise-authorize-app-roles
A3.1 — Create Azure AD Application
From Azure Active Directory admin center, navigate to Azure Active Directory > App registrations > + New registration
On the Register an application page, set the values as follows:
- Name: XYZ
- Supported account types: Accounts in this organizational directory only (Single tenant)
Click Register to create the application. Copy the values of Application (client) ID and Directory (tenant) ID; you’ll need these values later.
On the Overview page, click the Add a Redirect URI link under the Redirect URIs. Click Add a platform, then click Web.

On the Configure Web panel, use the following values:
- Redirect URIs: https://localhost:5001/signin-oidc
- Front-channel logout URL: https://localhost:5001/signout-oidc
- Implicit grant and hybrid flows: select ID tokens (used for implicit and hybrid flows)
Click Configure when finished setting these values.

A3.2 — Create a single organization ASP.NET web application
From a PowerShell command prompt, create a new ASP.NET Core MVC web application:
dotnet new mvc --auth SingleOrg -o XYZ
cd XYZ
dotnet add package Microsoft.Identity.Web
dotnet add package Microsoft.Identity.Web.UI
Open the root folder of the new ASP.NET core application using Visual Studio Code. When a dialog box asks if you want to add required assets to the project, select Yes.
In the ./appsettings.json file:
- Set the AzureAd.Domain property to the domain of your Azure AD tenant where you created the Azure AD application (for example: contoso.onmicrosoft.com).
- Set the AzureAd.TenantId property to the Directory (tenant) ID you copied when creating the Azure AD application.
- Set the AzureAd.ClientId property to the Application (client) ID you copied when creating the Azure AD application.
In the ./Views/Home/Index.cshtml file, add the following code to the end of the file:
@if (User.Identity.IsAuthenticated)
{
<div>
  <table cellpadding="2" cellspacing="2">
    <tr>
      <th>Claim</th>
      <th>Value</th>
    </tr>
    @foreach (var claim in User.Claims)
    {
      <tr>
        <td>@claim.Type</td>
        <td>@claim.Value</td>
      </tr>
    }
  </table>
</div>
}
(note: this code is for test purposes – it provides a simple way to confirm authentication)
Test what has been built so far:
dotnet dev-certs https –trust
dotnet build
dotnet run
In order to test the running application, open a browser and navigate to the url https://localhost:7060
(note: the port number may be different, check the output of the dotnet run command to see the exact url on which it is listening for the https protocol).
The web application will redirect you to the Azure AD sign-in page. After login and consent, Azure AD will redirect you back to the web application. Notice some of the details from the claims included in the ID token.

A3.3 — Add data models, sample data, controller and view
In the Models folder, create a new file named Category.cs and add the following code:
namespace XYZ.Models
{
  public class Category
  {
    public int ID { get; set; }
    public string Name { get; set; }
  }
}
In the Models folder, create a new file named Product.cs and add the following code:
namespace XYZ.Models
{
  public class Product
  {
    public int ID { get; set; }
    public string Name { get; set; }
    public Category Category { get; set; }
  }
}
This exercise will store sample data in-memory while the app is running. The data will randomly generated when the app is started using a NuGet package. Install the NuGet package by running the following from your command prompt in the project folder:
dotnet add package Bogus
Meanwhile, back in Visual Studio Code, create a new file named SampleData.cs in the root folder of the project. Add the following code:
using System.Collections.Generic;
using Bogus;
using XYZ.Models;

namespace XYZ
{
  public class SampleData
  {
    public List<Category> Categories { get; set; }
    public List<Product> Products { get; set; }

    public static SampleData Initialize()
    {
      var data = new SampleData();

      var categoryIds = 0;
      var categoryFaker = new Faker<Category>()
        .StrictMode(true)
        .RuleFor(c => c.ID, f => ++categoryIds)
        .RuleFor(c => c.Name, f => f.Commerce.Categories(1)[0]);
      data.Categories = categoryFaker.Generate(10);

      var productIds = 0;
      var productFaker = new Faker<Product>()
        .StrictMode(true)
        .RuleFor(p => p.ID, f => ++productIds)
        .RuleFor(p => p.Name, f => f.Commerce.Product())
        .RuleFor(p => p.Category, f => f.PickRandom(data.Categories));
      data.Products = productFaker.Generate(20);

      return data;
    }
  }
}
The sample data will be stored as a singleton in the dependency injection container built into ASP.NET core. Open the Program.cs file in the root folder of the project. Add a using statement for the namespace that contains the SampleData class:
using XYZ;
Add the following line immediately before the call to builder.Build() at the bottom of the builder code:
builder.Services.AddSingleton(SampleData.Initialize());
(note: this is the .NET 6 way of doing things. In .NET Core 5 and earlier, this is done in Startup.cs instead of Program.cs)
Add a new file ProductsController.cs to the Controllers folder. Add the following code to it:
using Microsoft.AspNetCore.Authorization;
using Microsoft.AspNetCore.Mvc;

namespace XYZ.Controllers
{
  [Authorize(Roles=("<VIEWER-GROUP-OBJECTID>"))]
  public class ProductsController : Controller
  {
    SampleData data;

    public ProductsController(SampleData data)
    {
      this.data = data;
    }

    public ActionResult Index()
    {
      return View(data.Products);
    }
  }
}
Create the view to display the products as follows. Add a new folder Products to the Views folder. Add a new file, Index.cshtml, to the new Products folder and add the following code:
@model IEnumerable<XYZ.Models.Product>

@{
  ViewData["Title"] = "Products";
}

<h1>Products</h1>

<table class="table">
  <thead>
    <tr>
      <th>
        @Html.DisplayNameFor(model => model.ID)
      </th>
      <th>
        @Html.DisplayNameFor(model => model.Name)
      </th>
      <th>
        @Html.DisplayNameFor(model => model.Category)
      </th>
    </tr>
  </thead>
  <tbody>
@foreach (var item in Model) {
    <tr>
      <td>
        @Html.DisplayFor(modelItem => item.ID)
      </td>
      <td>
        @Html.DisplayFor(modelItem => item.Name)
      </td>
      <td>
        @Html.DisplayFor(modelItem => item.Category.Name)
      </td>
    </tr>
}
  </tbody>
</table>
The ASP.NET identity system allows for an imperative test of membership via the User.IsInRole() method. Use this method to update the site navigation, showing a link to the Products controller only if the user is allowed to access it. Open the file Views\Shared_Layout.cshtml. In the <header> element is an unordered list (<ul>) of links that compose the navigation. The navigation has link to Home and Privacy. After the Privacy link, add the following code:
@if (User.IsInRole("<VIEWER-GROUP-OBJECTID>"))
{
  <li class="nav-item">
    <a class="nav-link text-dark" asp-area="" asp-controller="Products" asp-action="Index">Products</a>
  </li>
}
A3.4 — Utilize app roles
Now we configure the application registration to define app roles, assign users to those roles and authorize access to a controller using those assignments. App Roles for an app registration are defined by editing the manifest. The roles have a unique identifier, a display name and a value. The value can be inspected at runtime to make authorization decisions.
From the Azure Active Directory admin center click Azure Active Directory in the left-hand navigation. Click App registrations in the left-hand navigation. On the App registrations page, locate the application registration that represents the XYZ application. In the application registration for your application, select Manifest. Within the manifest editor, find the node named appRoles. The default value is an empty array. Replace the appRoles node with the following code:
"appRoles": [
  {
    "allowedMemberTypes": [ "User" ],
    "description": "Administrator role for Product Catalog web application.",
    "displayName": "ProductAdministrators",
    "id": "<NEW-GUID>",
    "isEnabled": true,
    "lang": null,
    "origin": "Application",
    "value": "ProductAdministrators"
  },
  {
    "allowedMemberTypes": [ "User" ],
    "description": "Viewer role for Product Catalog web application",
    "displayName": "ProductViewers",
    "id": "<NEW-GUID>",
    "isEnabled": true,
    "lang": null,
    "origin": "Application",
    "value": "ProductViewers"
  }
],
When updating the value of the appRoles node:
- Leave allowedMemberTypes set to “User” only.
- Make sure displayName and value don’t contain spaces.
- Replace <NEW-GUID> with a new GUID. Make sure ID is a unique GUID. The following PowerShell will generate a new GUID:
New-Guid
Assign roles to users as follows. On the Enterprise applications page, locate the application registration that represents the XYZ application. On the enterprise application overview pane, select Users and Groups.
Click Add user/group. On the add Assignment pane, click Users and groups. Select one or more users or groups from the list and then click the Select button at the bottom of the pane. We have selected the users. Next we assign roles to the selected users.
On the Add Assignment pane, click Select a role. Select the ProductAdministrators role to apply to the selected users or groups, then click Select at the bottom of the Select a role pane to return to the Add Assignment pane.
Select Assign at the bottom of the Add Assignment pane. The assigned users or groups have the permissions defined by the selected role for this enterprise app.
Open the ProductsController.cs file in the Controllers folder. Update the [Authorize] attribute to use the role names (specify multiple values allows access to members in either role):
[Authorize(Roles =("ProductViewers,ProductAdministrators"))]
Open the _Layout.cshtml file in the Views\Shared folder. Locate the call to User.IsInRole and change the statement to the following code:
@if (User.IsInRole("ProductViewers") || User.IsInRole("ProductAdministrators"))
Create a new file in the Models folder named ProductViewModel.cs. Add the following code:
using System.Collections.Generic;

namespace XYZ.Models
{
  public class ProductViewModel
  {
    public string ProductName { get; set; }
    public int CategoryId { get; set; }
    public List<Category> Categories { get; set; }
  }
}
Open the ProductsController.cs file in the Controllers folder. Add the following to the top of the file:
using System.Linq;
using XYZ.Models;
Add the following methods to the ProductsController.cs file:
[Authorize(Roles = ("ProductAdministrators"))]
public ActionResult Create()
{
  var viewModel = new ProductViewModel()
  {
    Categories = data.Categories
  };
  return View(viewModel);
}

[Authorize(Roles = ("ProductAdministrators"))]
[HttpPost]
[ValidateAntiForgeryToken]
public ActionResult Create([Bind("ProductName", "CategoryId")] ProductViewModel model)
{
  if (ModelState.IsValid)
  {
    data.Products.Add(new Product()
    {
      ID = data.Products.Max(p => p.ID) + 1,
      Name = model.ProductName,
      Category = data.Categories.FirstOrDefault(c => c.ID == model.CategoryId)
    });
    return RedirectToAction("Index");
  }
  return View(model);
}
Open the Index.cshtml file in the Views\Products folder. Above the
element, add the following code:@if (User.IsInRole("ProductAdministrators"))
{
<p>
<a asp-action="Create">Create New</a>
</p>
}
Create a new file in the Views\Products folder named Create.cshtml. Add the following to the file:
@model XYZ.Models.ProductViewModel

@{
  ViewData["Title"] = "New Product";
}

<h1>New Product</h1>
<hr />
<div class="row">
  <div class="col-md-4">
    <form asp-action="Create">
      <div asp-validation-summary="ModelOnly" class="text-danger"></div>
      <div class="form-group">
        <label asp-for="ProductName" class="control-label"></label>
        <input asp-for="ProductName" class="form-control" />
        <span asp-validation-for="ProductName" class="text-danger"></span>
      </div>
      <div class="form-group">
        <label asp-for="CategoryId" class="control-label"></label>
        <select asp-for="CategoryId"
                asp-items=@(new SelectList(Model.Categories,"ID","Name"))
                class="form-control">
        </select>
        <span asp-validation-for="CategoryId" class="text-danger"></span>
      </div>
      <div class="form-group">
        <input type="submit" value="Save" class="btn btn-primary" />
      </div>
    </form>
  </div>
</div>

<div>
  <a asp-action="Index">Back to List</a>
</div>

@section Scripts {
  @{await Html.RenderPartialAsync("_ValidationScriptsPartial");}
}
A3.5 — Build and test the web app
Execute the following commands to compile and run the application:
dotnet dev-certs https --trust
dotnet build
dotnet run
Open a browser and navigate to the url https://localhost:5001 (or whatever the port number is on which it is listening). The web application will redirect you to the Azure AD sign-in page. Sign in using an account from your Azure AD directory. The first login will prompt for consent to the scopes required by the web API. After consent, Azure AD will redirect you back to the web application.
(Note: You must login after assigning app roles to the user. Any logins that occurred before the update will result in a token that does not reflect the assignments. Close the browser or select Sign out to sign out of the session.)
On the home page, the assigned roles are included in the list of claims. If the user has been assigned the correct role, the navigation will include a link to the Products controller.

A3.6 — Troubleshooting
Missed prompt for adding required assets
The Visual Studio Code C# extension can generate assets to build and debug for you. If you missed the prompt when you first opened a new C# project, you can still run this command by opening the Command Palette (View > Command Palette) and typing “>.NET: Generate Assets for Build and Debug”. Selecting this will generate the .vscode, launch.json, and tasks.json configuration files that you need.
APPENDIX 4 — Replacing AzureDev.FunctionApp with Standalone Function App
In 2024 AzureDev was upgraded from .NET 6 to .NET 8 using the dotnet upgrade assistant. The previous Function App which provided access to the database and was integrated into the AzureDev application, was replaced with a new .NET 8 standalone function app. The new .NET 8 function app was encapsulated within an APIM which served as a reverse-proxy, thereby simplifying the management of security keys.
A4.1 - Motivation
The .NET 8 upgrade proceeded smoothly for all .NET projects within the AzureDev .NET solution except for the Function App. The previous .NET function app project, FunctionApp, hosted online in an Azure App Service named rob-das-function-app, was written in .NET 6 with the dotnet in-process web worker model, and used parameter binding to work with the database. It was announced in 2024 that the in-process dotnet web worker model was deprecated, and should be replaced with the dotnet-isolated model. When converted to .NET 8, the syntax for parameter binding utilizing attributes was no longer recognized by the C# compiler.
// NO LONGER SUPPORTED SYNTAX
[FunctionName("UpdateSimpleData")]
public static IActionResult Run(
  [HttpTrigger(
    AuthorizationLevel.Function,
    "put",
    Route = "UpdateSimpleData/{id}")] HttpRequest req,
  [CosmosDB(
    databaseName: "azuredev",
    collectionName: "simpledata",
    ConnectionStringSetting = "CosmosDBConnection",
    Id = "{id}",
    PartitionKey = "{id}")] SimpleDataModel inputDocument,
  [CosmosDB(
    databaseName: "azuredev",
    collectionName: "simpledata",
    ConnectionStringSetting = "CosmosDBConnection",
    Id = "{id}",
    PartitionKey = "{id}")] out dynamic outputDocument)
No straightforward equivalent for .NET 8 could (easily) be found.
Since the rob-das-function-app app service was created using the “dotnet” web worker model and could not be changed to the “dotnet-isolated” model, a new app service was created, which provided an opportunity to rewrite the function app from scratch using a different design pattern to access the database. Entity Framework for CosmosDB was chosen to replace parameter binding.
A4.2 Implementation overview
A new .NET 8 function app was created that provided the same interface as the previous .NET 6 function app in order to minimize client code changes.
The new architecture consists of a source code git repository specifically for the function app; the existing source code git repository for AzureDev (minus the old function app); the development computer environment with vscode; the function app hosting environment; the AzureDev web application hosting environment; the local development/test CosmosDB database emulator; and the online CosmosDB database.
A4.2.1 Source code overview
A new standalone .NET 8 Function App using the dotnet-isolated worker model was created. Each function from the previous implementation was reproduced so that it could be called in the same way. A separate source code repository was created. After successfully deploying and testing the new function app, the previous one was deleted from the AzureDev solution.
In order to eliminate the need for function app client code changes, the frontend MVC App was refactored to pull the Function App’s API suffix from configuration using the C# configuration manager, which in-turn pulled the API suffix, locally from AppSettings.json, and online from the web app’s configuration settings. This meant that during testing, the client app could switch between the old and new implementations just by changing a configuration value, thus making it easy to compare old and new behavior.
A4.2.2 Online web app overview
A new function app created online called rob-das-func was created to replace the previous function app called rob-das-function-app. The function app was deployed directly from VSCode to the online app using the Azure extensions for VSCode.
The current deployment workflow is to use a development computer to pull the source code from the remote git repo, and deploy it directly to rob-das-func with vscode (we plan to create a CI/CD pipeline in Azure Devops for a future release (Done.)).
A4.2.3 Deployment overview
The two methods for deployment of the function app to the hosting environment in Azure are:
- VSCode deployment from the developer’s computer using the VSCode Azure extension
- Azure DevOps CI/CD pipeline
The preferred method is the CI/CD pipeline. The VSCode deployment is a fallback plan in case problems arise with the pipeline.
A4.3 Implementation details
The implementation in C# of the individual functions within the function app is essentially a refactoring that preserves the existing programming interface and internal code behavior, but uses a different programming model that’s based on the EF object model design pattern instead of the parameter binding pattern. The trade-off between declarative and imperative programming was switched around. The difficulties of reproducing the original behaviour with the new C# parameter binding syntax, essentially cancelled out the benefits of declarative vs imperative programming. The function app itself is built as a microservice providing CRUD operations against the database and exposing those operations through a restful API. This approach can easily be achieved with the well known EF based design patterns, which results in easily understandable and maintainable code.
A4.3.1 Local source code development details
Visual Studio Code was used to build the .NET 8 version of the function app from scratch.
- In Visual Studio Code, press F1 to open the command palette and search for and run the command Azure Functions: Create New Project…
- Select the directory location for your project workspace and choose Select.
- Provide the following information at the prompts
| Prompt | Selection |
|---|---|
| Select a language for your function project | Choose C#. |
| Select a .NET runtime | Choose .NET 8.0 Isolated (LTS). |
| Select a template for your project’s first function | Choose HTTP trigger. |
| Provide a function name Type | Function1 |
| Provide a namespace Type | FunctionApp |
| Authorization level | Choose Anonymous, which enables anyone to call your function endpoint. |
| Select how you would like to open your project | Select Open in current window. |
Immediately upon creation, start debugging with F5. The first time you press F5 it will set up the debugging, but will not actually start debugging. After that when you press F5, debugging will work and it will stop at breakpoints when you call URLs (browser, or postman, or similar).
A4.3.2 Online web app details
Visual Studio Code was used for the initial publish/deploy to Azure. Once the function app is deployed to Azure, add it to APIM. In the Azure portal, navigate to:
azuredevapim > APIs > APIs > Create from Azure resource > Function App
Note: do not click the “+ Add API” button.

A4.3.3 Deployment details
Once the function app is on Azure and the APIM has been created from the function app, the APIM will reflect all changes to the function app as soon as they are deployed.
A4.3.3.1 VSCode deployment
First make sure the Azure extensions are installed in VSCode. Then select the Azure icon on the left menu. Under Resources, expand the subscription, find the target function app, right click on it and select “Deploy to Function App…”

A4.3.3.2 Pipeline deployment
The second way of deploying the function app is to push the code changes to Azure DevOps Repo, and trigger the DevOps pipeline to get the latest code in the DevOps repo, build it and deploy it to the function app hosted in Azure. The entire process is scripted using a YAML file called azure-pipelines.yml which automates everything. This protects the deployment from human error which may occur in an interactive approach such as deploying from VSCode. It also provides the flexibility to add additional steps to the automated process such as unit testing. The YAML script can be triggered in several ways including manually triggered, triggered by code pushed to the repo, and other triggers.
Since the code is deployed from Azure DevOps to Azure, a trust relationship has to be set up through security at both ends. If this is forgotten, then attempting to run the pipeline will result in a “resource authorization issue” error.

Clicking on Authorize resources, a message pops up saying Resource Authorized, but it doesn’t really change anything – the pipeline still fails when you try to run it again.
On the DevOps side you have to create a Pipeline/Service Connection and configure it to be allowed to access the function app that is hosted in Azure.
On the Azure side you have to configure the function app, rob-das-func, to allow the DevOps pipeline to have access.
Create a Service Connection in DevOps
In DevOps go to Project Settings (bottom-left corner), and select Service connections under the Pipelines section. Click on New service connection and choose Azure Resource Manager.

Important: tick the Security box at the bottom labelled “Grant access permission to all pipelines”.
The service connection name is used in the pipeline YAML file, azure-pipelines.yml
- job: Deploy
  steps:
  - task: AzureFunctionApp@1
    inputs:
      azureSubscription: 'AzureFunctionAppConnection'
This provides the pipeline with the necessary access to resources under the specified subscription and resource group.
Configure Function App in Azure
In Azure portal navigate to the function app Configuration/General Settings, turn on SCM and set FTP state to All allowed.

A4.4 Security
This section covers function app security and pipeline deployment security.
A4.4.1 Function App Security
The security model for the functions in the function app no longer require a separate key for each function because the APIM wraps the functions in its own layer of security.
The APIM serves the function app’s functions as a restful API. The APIM has endpoints for each function. The function app itself is protected behind the APIM’s reverse proxy. To access the APIM’s reverse proxy, clients must provide an APIM subscription key

Key vault secrets are accessed from three resources in the Default Directory:
| Resource | Name |
|---|---|
| MVC APP | rob-das-win |
| FUNCTION APP | rob-das-func |
| WEB API | rob-das-api |
Authetication is done with Microsoft Identity Platform using Identity Access Management (IAM). Each resource in the same directory as the key vault, that needs to access to the key vault, is given a system assigned managed identity with the Microsoft Identity Platform (Entra Id). This registers the resource in the same directory as the key vault. Once the resource is known to Microsoft Identity Platform, no further authentication is needed, eliminating the need for passwords or keys. Managed Identities for Azure resources allows the app to access Key Vault and other Azure services without having to manage even a single secret outside of the vault.

To access secrets in the key vault, resources require both Get and List permissions, which are granted from the key vault itself using access policies. To grant the Azure Function App’s managed identity access to your Azure Key Vault, assign an access policy within the Key Vault. Click on the “+ Create” button and follow the wizard to assign access to the functions app’s managed identity.

To verify that access has been granted to the key vault, go to Key vault > Access control (IAM)

If they do not show up, then
- click the “Add role assignment” button
- In the “Role” dropdown, select “Key Vault Secrets User”
- Select the function app’s managed identity
- Click “Review and create” to confirm the role assignment
A4.4.2 Pipeline deployment security
Since the code is deployed from Azure DevOps to Azure, a trust relationship has to be set up through security at both ends. If this is forgotten, then attempting to run the pipeline will result in a “resource authorization issue” error.
Setup for pipeline deployment security is documented in the previous section “Implementation details” under Pipeline deployment.
A4 References
https://dotnet.microsoft.com/en-us/platform/upgrade-assistant
https://learn.microsoft.com/en-us/azure/azure-functions/create-first-function-vs-code-csharp
https://aka.ms/yamlauthz
https://learn.microsoft.com/en-us/azure/devops/pipelines/process/resources?view=azure-devops#resource-authorization-in-yaml-pipelines